In this article we’ll show you how to setup both an avatar from the community and how to use a custom avatar of your own.
Selecting an Avatar from the Community
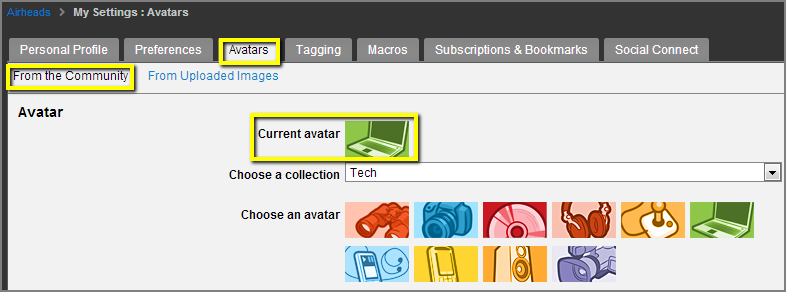
To select an avatar from the community, navigate to “My Settings” / “Avatars” / “From the Community”. From here you’ll see a drop down list to “Choose a collection”. The drop down list allows you to preview all the default avatar collections for the community.

(Figure 1: Avatars: Choosing a Collection from the Community)
Once you find the avatar that you’d like to use, choose the avatar by clicking on the “preview image” of the avatar. The newly selected avatar will then show up next to the “Current Avatar” text.

(Figure 2: Avatars: Current Avatar)
Using a Custom Avatar of Your Own
In order to use a custom avatar of your own, within the community, you’ll first need to upload the image to your image gallery.
- Click on your username at the top of the community to go to your “profile page”.

(Figure 3: Profile Page: Click your username)
- From the “profile page”, navigate down the right side until you see the widget titled “Images for (your username)” and select “Upload an Image”.

(Figure 4: Image Gallery widget)
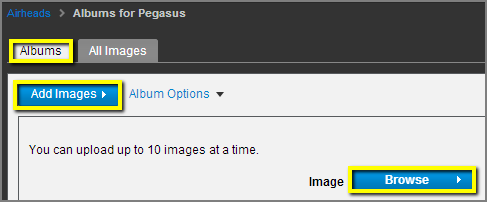
- You are now in your image gallery. On the “Albums” tab, select the “Add Images” option and then “Browse” to browse your PC for the image you’d like to upload. (Note: Please make sure the image you select is appropriate for the community and doesn’t violate any of the community Terms of Service.)

(Figure 5: Browse: To Select an Image to Add to Your Gallery)
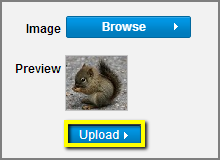
- You will then see a preview of the image that you selected. Note it is not uploaded to your gallery, it’s only a preview. To upload the previewed image, select the “Upload” button to continue with adding the image to your gallery.

(Figure 6: Image Preview / upload option)
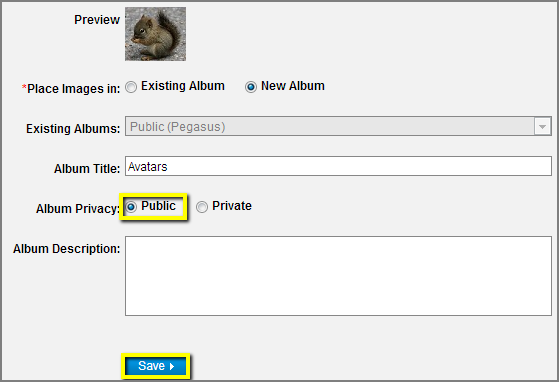
- You’ll then be asked where to save the image. You can add the image to an existing album or create a new album for the image. Whichever you choose, make sure to set the album’s privacy to public or no one will be able to see your Avatar. When you’ve finished, don’t forget to “Save” the image to the public album of your choice.

(Figure 7: Public Album: Save Image to Album)
Now that you have your avatar uploaded, you need to set it as your current avatar. To set it up, navigate to “My Settings” / “Avatars” / “From Uploaded Images”.

(Figure 8: Avatars: Choose from Uploaded Images)
You’ll see all of your personal uploaded images that you can choose from as an avatar. Click on the image that you’d like to set as your current avatar. You’ll then be taken back to the default avatar tab and your new custom avatar will be displayed as the “Current avatar”.

(Figure 9: Avatars: Current Custom Avatar)
Enjoy your new Avatar!