Here is a guide to Rip and Replace for large Campus deployments. This pertains to Planning, Design, and AP Provisioning methods. Enjoy!
WIRELESS NETWORK DEPLOYMENT
An Engineer’s guide to rip and replace best practices
by: Matt Bonadies
Indiana University
mbonadie@iu.edu
Preface
This document is intended to help aid the management and deployment of Rip and Replace wireless deployments. It also assumes the use and understanding of Aruba WLAN systems, and that you have a pre-existing production WLAN. However, it can serve as a guide to the deployment of any wireless network equipment and is vendor neutral.
Rip and Replace: A complicated task
A few years ago, my colleagues and I from two campuses were tasked with a Rip and Replace project to upgrade the current wireless network infrastructure to Aruba. At the time, we had a combined total of about 5,500 access points deployed. My campus was around 4,300 active access points deployed in about 250 different buildings. Not the largest deployment, but still a complicated task. What made it complicated was our accelerated timeline of 6 weeks from start to finish!
I was also a VERY new wireless network engineer and worked my way to the position from a phone/data cabling background. So, luckily, I knew quite a lot about our current infrastructure, where the current access points were located, and how to make my way around campus efficiently. So how do you do it? During our planning meetings, the wireless team decided on a process to Rip and Replace each access point with one method. This would also include data tracking, inventory tracking, and installation methods. In the document, I will describe step by step how we accomplished this.
Assess the task at hand
Try to define the problem. The task was to remove and replace 4,300 wireless access points in 6 weeks. This is what you need to do.
- Figure out your total number of access points per location
- Decide on a labeling scheme
- Track the data and inventory
- Recruit helpers
- Install the access points
- Confirm installation
- Provision AP Groups
Label Scheme for Wireless
Conveniently, the campus has a defined method for data jack tracking with an accessible database. It is a custom database, and can export a file to be manipulated in any “Excel” type spreadsheet software package. I will show you an example of our data jack labels and what it means below. Figure 1 represents the labeling scheme that helps up keep track of all data jacks. I’ll break it down here:
- BL578: BL=Bloomington, 578 is the building ID number.
- CR: CR is the 2-letter abbreviation for the building name. This AP lives in the Cyberinfrastructure Building at Indiana University.
- 121: 121 represents the room number.
- WD: WD represents “Wireless Data”.
- E: E is the unique data jack identifier for the number of data jacks in the same room. This just means that jacks 121-WD-A through 121-WD-E are in the same physical room.

Figure 1. Label Scheme on a glossy AP-225.
Your scheme doesn’t have to match this, but something logical will help you track the AP’s. I like best the Room number and jack identifier. When you decide on your labeling scheme, input this into a spreadsheet in sequential order. This is important, as you will not want to mix up the unique identifier and jack ID fields. You’ll see why in the next paragraphs. Figure 2 is an example of one such spreadsheet:

Figure 2. AP MAC Address, Jack ID and Serial Number
The idea here is to keep track of each radio, serial number, and jack ID to make provisioning a large quantity of access points efficient and easy. This also allows the creation of labels to stick on the radio out in the field. This helps installers by giving them direction to the proper placement of access points based on your network design.
Deployment Pre-Staging and Planning
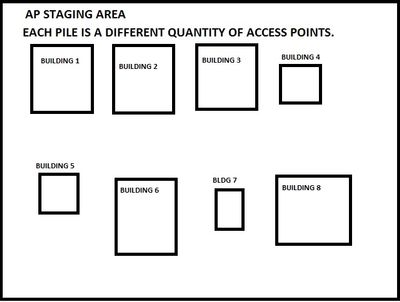
If you have a large quantity of access points going to many buildings, you should create separate “piles” of boxes. Label each pile the name of the building. This is best done if you have a large room or warehouse where you can pre-stage all of your equipment.

Figure 3. Example Staging Area for multiple buildings.
You should also purchase a barcode scanner. I use a moderately priced unit made by Wasp. This will make the inputting of MAC addresses and Serial numbers fast and accurate.

Figure 4. My Barcode Scanner.
Trust me, you will enjoy using one. Just don’t mix up any of the fields while trying to sort. You risk labeling MAC address to jack ID incorrectly and it can get messy. Once you have your blueprints and jack lists created, you can think about labeling the access points. Here are the steps:
- Scan all MAC addresses into spreadsheet.
- Scan the corresponding AP serial number to match its MAC address.
- Assign a unique Jack ID to each AP.
- Print label sheet.
- Place label on Access Point.
You need some sort of blueprint, drawing, sketch, doodle or picture of the floor plans for your access point deployments. Otherwise, you will never know how to easily identify the correct device in the correct location. This is especially true if you use Airwave and VisualRF to monitor your RF surveys. It really helps the troubleshooting process. When all is organized, sorted, and labeled it’s just a matter of installation.
Installation of Access Points
You would think this is a no-brainer. But in a Rip and Replace, it does matter. If the access points that are being replaced do not have a standard way to “mount” its bracket, then installation will take longer. That is, unless, you will be mounting the AP to the ceiling. Our campus has a mixture of wall-mounted access points and ceiling mounted access points. Each bracket will mount to a standard single-gang electrical box. So, all of the holes lined up. If this is your situation, you are in luck. If not, make sure you have a good hammer drill. Our team was lucky enough to have about 12 extra helpers. Each were equipped with a hammer drill, battery powered drill, blueprints, screwdrivers, and carrying tote to install the access points. Without their help the deadline of 6 weeks would not have been possible.
Installation Confirmation
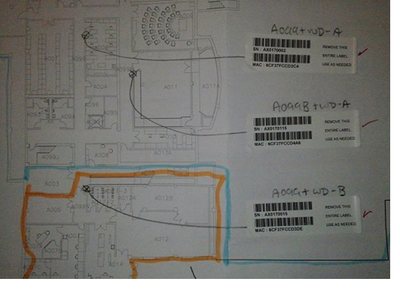
This is where the blueprints come into play. I call mine “Wireless As-Builts”. It shows the building floor plan, the location of each access point, the access point’s unique Jack ID, and the supplied sticker which contains the MAC address and serial number that you scanned earlier. Here is a picture:

Figure 5. Wireless As-Built
I create these before I leave the building. Some benefits to as-builts are if you lose all of your electronic documentation you can re-create with the barcode scanner what was lost by having a hard copy. Just make sure to back up your data. Also, if there is any question about coverage in specific locations you can refer to your blueprints. This is good stuff here.
AP Groups and Provisioning
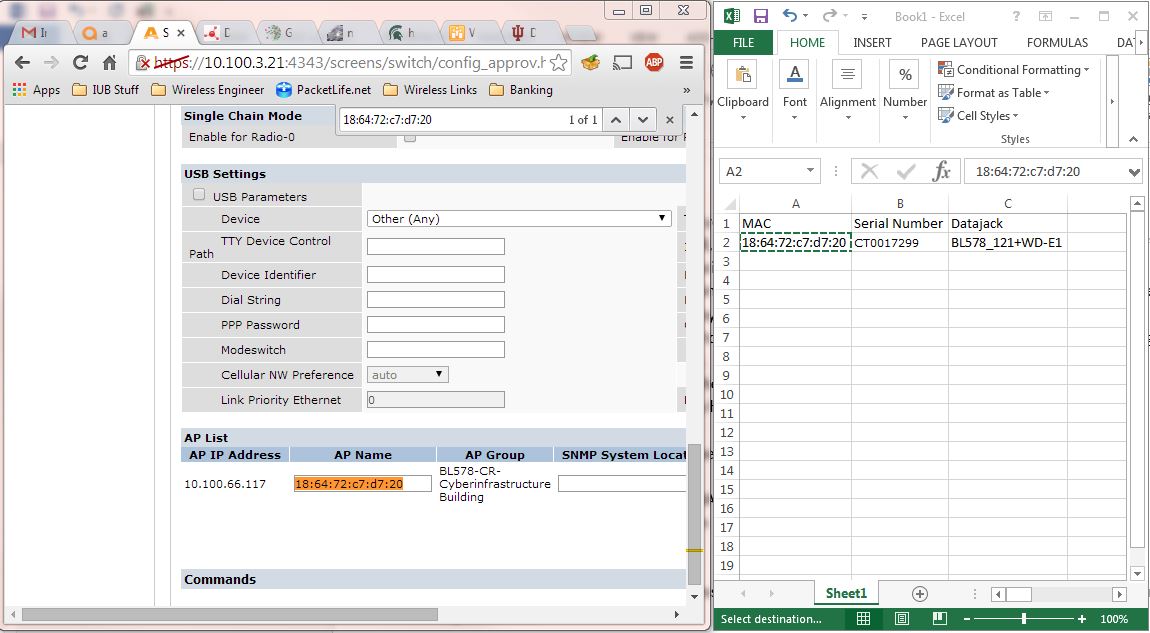
At this point you have all of your access points installed and your network should be operational. If your network is small, then you should just leave your access points in the “default” group. Since we had 4,300 access points to manage we created one AP Group per building on our controllers to simplify network administration and troubleshooting. You should only provision one building at a time in very large deployments. This will keep it less confusing. Then you won’t have to search for the access point in order to provision it. Leave another engineer the task of provisioning while another team does the install. Here you need to open up the spreadsheet that has the corresponding building information that was just installed. Two screens help here but are not necessary. Here are the provisioning steps:
Controller GUI:
- Select the access points to be provisioned
- Select AP group
- Select and copy either AP MAC address or Serial Number
- Go back to Controller screen
Chrome screen search:
- Hit “Ctrl-F” to search
- Paste into search box
Once you have found your first access point, if desired, rename it to your listed Jack ID from the same spreadsheet.

Figure 6. Copy & Paste between Excel and Controller.
A final word
I hope that the steps listed in this document help with the installation process. With the proper preparation and documentation, large Rip and Replace deployments will be easier to manage. Plus, you should be able to achieve a fast deployment. We did it in six weeks! Feel free to tailor your own methods based on the methods listed above, as they are vendor-neutral.
Matt Bonadies
Indiana University
mbonadie@iu.edu