Over my career I’ve stumbled upon numerous methods and tools that have been exactly what I needed when I needed it. As is common in our field, I’ve amassed quite the collection of various self-written scripts, freeware programs, $0.99 apps, and documents detailing very specific ways of solving very specific problems which are sprinkled throughout my hard drives. But within the past year or two I’ve run across a few applications that are incredibly well hidden, have helped me out more than once, and I think would be useful in the virtual toolbox of any engineer out there. So today, instead of the lengthy diatribe about the failures of technology X or my love of device Y I tend to write, I present to you these tools. You may or may not know of them but they are built right into your MacBooks, iPads, and iPhones (after a couple downloads and program installations).
Remote Virtual Interface Tool (iOS):
For this to work you will need the OS X Command Line Tools which can be obtained by either installing Xcode from the App Store and then running the following command from your terminal:
xcode-select —install
or if you have a developer account by visiting https://developer.apple.com/downloads
From the man page:
"Remote Virtual Interface Tool starts and stops a remote packet capture instance for any set of attached mobile devices. It can also provide feedback on any attached devices that are currently relaying packets back to this host.”
Introduced in OS X Mavericks (10.9), this is a very simple tool to use yet it is so very powerful when placed in the right hands. The ability to capture packets as the client sees them is invaluable for those times when you need to isolate an issue that may be client specific or particularly vexing or even when you are diagnosing application issues and want to simply confirm or deny your Wi-Fi network as the cause by seeing the performance over 3G/4G/LTE.
To use this tool you’ll need an iOS powered device (obviously), an OS X computer, a USB cable to attach the device to your computer (30-pin or lightning cable), and a terminal window. I prefer iTerm2 but the built in Terminal.app will work just fine.
Start off by finding the UDID of your phone or tablet. The UDID is a unique 40-character hex string which can be obtained by attaching your device to your computer and opening iTunes. Once at the device management screen, simply click the “Serial Number” field until it shows your “UDID” and viola. Right-click, copy, and you’re set. You can also do this through Xcode in the “Devices” window.
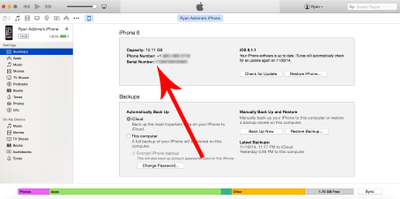
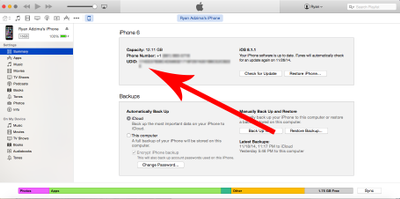
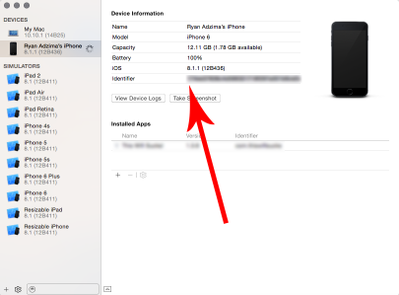
Now open up your terminal and enter:
rvictl -s XXXeeXXXXXcXdXXXXXXXXXfXXXaXXXbXceXcbXXe
Where “XXXeeXXXXXcXdXXXXXXXXXfXXXaXXXbXceXcbXXe” is replaced with your UDID.
From there you should see:
Starting device XXXeeXXXXXcXdXXXXXXXXXfXXXaXXXbXceXcbXXe [SUCCEEDED] with interface rvi0
And just to verify it’s working a quick interface listing will show rvi0
ifconfig -l
and using the Remote Virtual Interface Tool list option you’ll see your newly created remote virtual interface
rvictl -l
Now it's as easy as running a packet capture on any interface you've done in the past. You’ll need to run this as a superuser so don’t forget the “sudo” at the beginning. You can insert your favorite tcpdump options as needed but to get started I’m using the command below. This will get the packets with absolute sequence numbers (-S), full payload (-X), all packet info (-s0), no hostname translation of IP addresses or port name translation (-nn), only the first 100 packets (-c), and it will be written to the file iOScap.pcap (-w).
sudo tcpdump -i rvi0 -nnSXs 0 -c 100 -w iOScap.pcap
Now open that up in Wireshark or Omnipeek and you’re looking at exactly what the client is seeing.
For more info on the tcpdump utility, head over to the Mac Developer Library and check out the tcpdump man page or just type “man tcpdump” into your terminal window. Be prepared for a lot of reading and even more scrolling… tcpdump can be a bit overwhelming at first.
Network Link Conditioner (OS X):
Network Link Conditioner was created to help application developers write better programs. I kid… sort of. Not so long ago developers would write an application on a powerful workstation with a local database and no network latency (because everything was local) and the second the app was released into the wild everything would fail and the network engineer’s phone would start ringing with wild claims of network instability. Apple created this tool to allow developers the opportunity to simulate adverse network conditions on OS X systems. This gives greater ability to write fault tolerant applications that laugh at latency and low bandwidth.
I know, you’re not a developer… but guess what? You are the Wi-Fi engineer. What gets blamed first when mobile devices can’t talk to applications properly? That’s right, the WLAN. Wouldn’t it be great to sit at a desktop connected to a solid 1Gb link and throttle that connection until the application fails while still maintaining what we consider to be reasonable for WLANs and then mush the dev nose in the results? I thought so.
This tool requires an additional package called “Hardware I/O Tools for Xcode” that can be found on the Apple Developer Download page. Be sure to select the appropriate release for your system.
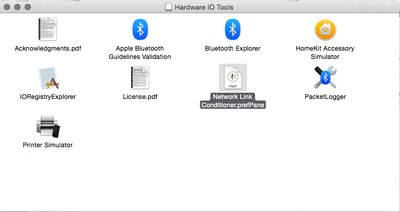
Once you’ve downloaded the DMG and have it open you’ll need to double-click “Network Link Conditioner.prefPane” to install it. It will be located in your “System Preferences” at the bottom.
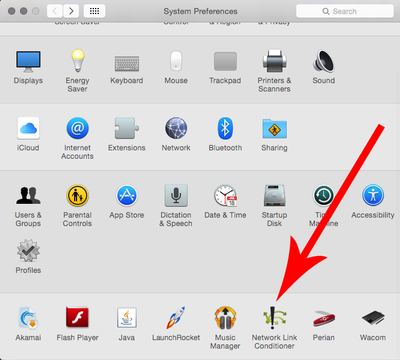
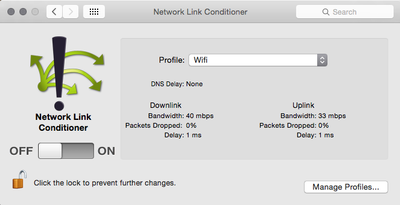
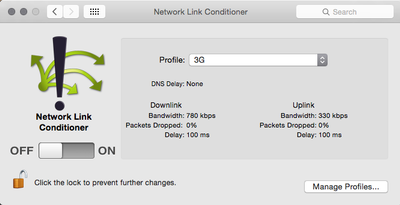
That’s really it. Once you launch the utility from the preference pane you’re presented with a very minimal screen. The tool has all sorts of built in profiles ranging from Wi-Fi which will disguise your network connection as a 40Mbps down, 33Mbps up, 1ms delay, 0% packet loss link to 3G masking your link as a 780Kbps down, 330Kbps up, 100ms delay, 0% packet loss network all the way down to 100% Loss which will simulate… you guessed it, 100% packet loss.
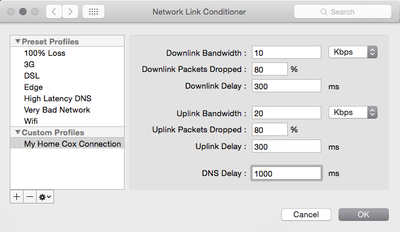
Taking the tool even further, you can create custom profiles just in case you’re on 802.11ac and think a 40Mbps downlink doesn’t properly represent your clients. The settings give you the ability to tailor the connection speed (in Kbps or Mbps), percentage of packet loss, and delay for both uplink and downlink (because asynchronous connections). Additionally you can even add in some seriously heavy DNS delay (in ms) and replicate my home connection.
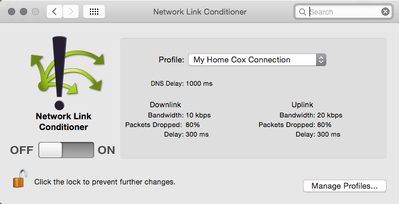
Once you select the profile you want to use or create your own, just click the slider over to “On” and suddenly you’re the architect of a new network reality.
I’ve found this quite useful in both real-world application troubleshooting, web application development, and home lab work. Hopefully you will too.
Side Note: The “Hardware I/O Tools for Xcode” also has some other really nifty apps that don’t necessarily apply to Wi-Fi engineering directly but I’m pretty sure one of the job requirements of a Wi-Fi engineer is to know everything about everything just in case someone asks. If you’re more of a Mobility type of person, the Bluetooth tools may be right up your alley with the ability to capture, decode, and analyze Bluetooth communications on the fly (Beacons anyone?).
BONUS
Airport Utility Wi-Fi Scan (iOS):
I didn’t discover this, it isn’t that old, and it’s already been written about here http://community.arubanetworks.com/t5/Technology-Blog/Apple-iOS-8-WiFi-Scanning-Returns/ba-p/203015 but in case you missed it… Apple brought it back! Although I don’t remember ever using it before so for all I know it was gone for a month. Go check out my good friend George’s post for more details.
DOUBLE BONUS
Network Link Conditioner for iOS!!!
I just found this now while putting together screenshots and polishing this post. After using this utility so many times on my desktops and laptops, finagling around with simulators and internet connection sharing to test on actual live mobile devices, I am ecstatic.
First, this utility does require an active Apple Developer account. Start by adding your UDID to a developer account (if you have a dev account you’ll know how, if you don’t… find someone who does). Now after a couple minutes you should see a new menu option in your “Settings” app labeled “Developer” and within there you’ll find “Network Link Conditioner” with the status set to Off. Once you dive into that menu everything will look familiar with the same exact options as you’d find on the OS X version.
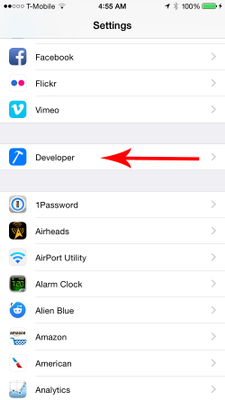
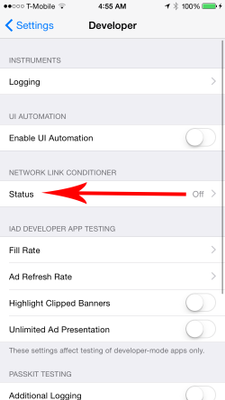
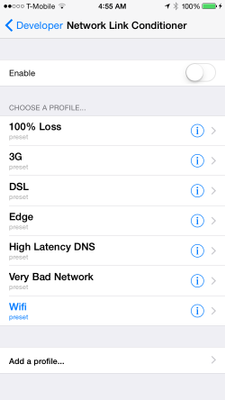
If you know about and have used these tools before, I’d love to hear from you. If any of these are new to you and you have questions or comments, leave them below.
Enjoy.