I recently had a particular situation with a customer who have multiple Clearpass servers worldwide which are all clustered together. They were using MAC Caching for their guests MAC authentication and a lot of time the caching wasn't working properly so clients needed to re-auth several times a day.
So, I gave a try to the Time Source feature (Available since Clearpass 6.3) which solved all the problems theyhad. I also personally prefer this method and think that for big deployments, it makes sense to use Time Source prior to MAC Caching.
Here are the main reasons:
- MAC Caching depends on Insight SQL database to verify if user exceeds the caching period (E.G 7 days)
- Time Source is updated to the endpoints db which are synced locally to every suscriber of the cluster (resulting in a faster and more reliable solution)
During this document, we will :
- Configure Time Source Authentication Source
- Create 2 Services (Caching and MAC Auth)
- Test the solution
It’s also made assuming that you want to use it with a SSID named : Guest
Which will authenticate Guest users J. It could be combined with other authentication methods but MAC auth isn’t secure so let’s just keep it for a guest network with no risks.
First thing first! Let’s start by editing the Time Source authentication source.
Go to Configuration -> Authentication -> Sources and select [Time Source]

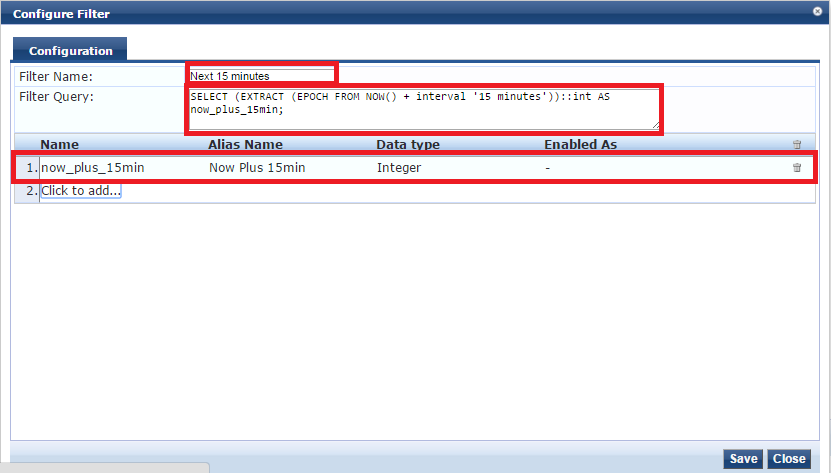
What I personally suggest it to create a new filter with a low value (E.G 5 or 15 minutes) so later on, you will be able to test if newly implemented feature is working and wait 5 minutes instead of 2 hours :) .
To achieve, simply click ``Add More Filters``

Then enter the following to have a Now + 15 minutes value:
We need to configure at least 1 enforcement profile which will be applied to a user that successfully authenticate. Cool thing is that you can create many profiles with different expirations, then apply them to different roles/conditions.
Go to Configuration -> Enforcement -> Profiles -> Click ``Add``
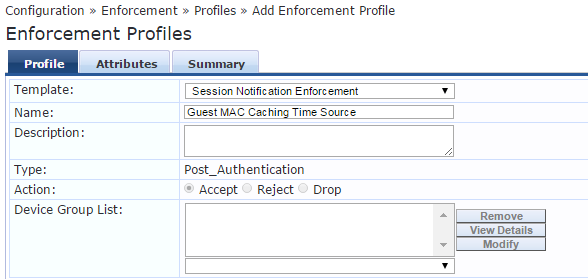
Attributes tab should be configured as follow:

(Now Plus 15min should be typed exactly as the Alias name of preceding step)
Save it and go to next step.
Once completed, we will now create the 2 services which will be used combined with Time Source.
We will now create 2 services from scratch:
- Guest MAC Authentication With Time Source * (Device which already authentified before with non expired MAC-Auth-Expiry attribute will success this service. Else, it will reject and hit ''Guest Caching With Time Source '')
- Guest Caching With Time Source * (when a device's MAC gets a deny on the ''Guest MAC Authentication With Time Source'' service it will hit this service and need to authenticate)
* We will be creating the services manually with as less extra as possible just to make it work so it remains easy to understand, then later on, you can add more Enforcement Profiles or Conditions.
Creating the ''Guest MAC Authentication With Time Source'' service:
Go to the Publisher, then Configuration -> Services and click add

Then configure the service as follow:
(You can add a SSID name in the service rule section if you want this service to be specific to one SSID)

Configure the Authentication tab:
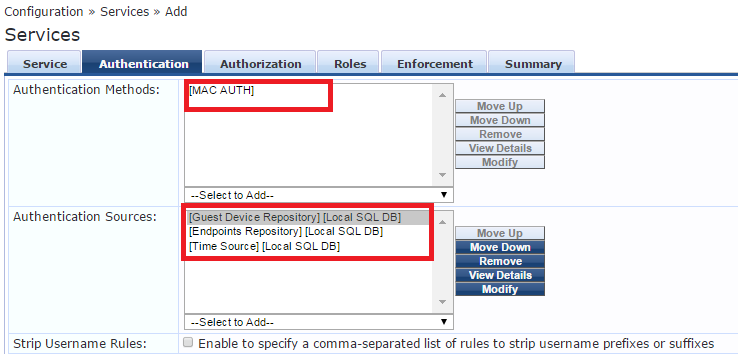
Configure the Authorization tab:

Configure the Roles Tab:
(Through this document, i sometime photoshopped text to other values for privacy reasons :) )
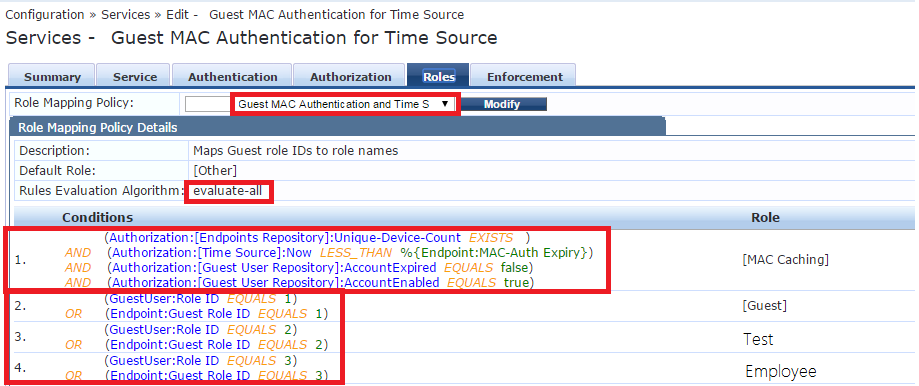
Let’s forget about 3 other rules in the first condition and focus on the most important string: (Authorization:[Time Source]:Now LESS_THAN %{Endpoint:MAC-Auth Expiry})
What it does is quite simple, it verifies if current time is less than expiring time. If it is, then rule condition is fulfilled and Role [Mac Caching] is applied.
Time format used by Clearpass is EPOCH (Unix Time), you can go to: http://www.epochconverter.com/ if you want to convert EPOCH to human readable time.
Let’s do a quick example:
I connect to the Guest SSID with a Device that already connected 2 days ago with Role ID 1.
(Please note this is fictive EPOCH time, I didn’t do the conversion since it’s just an example)
This endpoint’s MAC-Auth-Expiry value is: 1452044290 (EPOCH)
The current EPOCH time value is: 1452011290 (EPOCH)
In this example, current time is less than expiration time, meaning that the device is not yet expired and resulting in a match with our (Authorization:[Time Source]:Now LESS_THAN %{Endpoint:MAC-Auth Expiry}) rule.
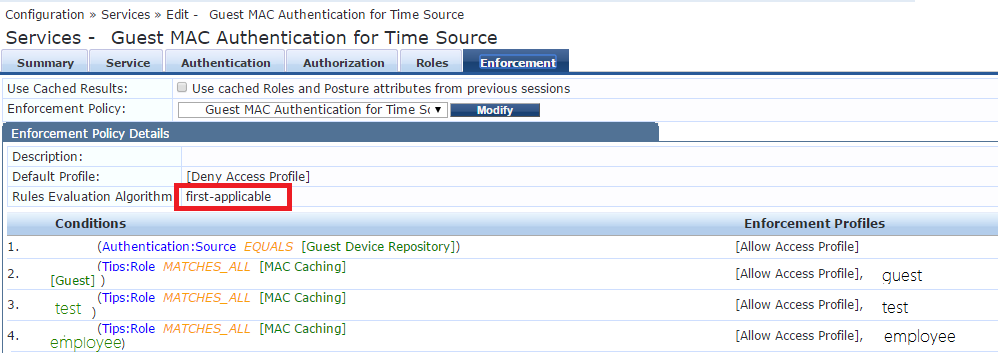
Next, we will set-up the Enforcement tab:
- 1st condition is used with a static device list which are always MAC authenticated with no caching (for devices which doesn’t support captive portal or V.I.P people who don’t like to re auth :) )
- Other condition means you must have the [MAC Caching] role + 1 of the other ``Role Tags`` in preceding tab. (I call them role tags since this is what they are, roles from the Roles tab are just tags that you can use in Clearpass after.)
- Rules Evaluation Algorithm should be first-applicable
Great! First service is now completed, next, we will set-up the 2nd one.
Creating the ''Guest Caching With Time Source'' service:
Configure service as follow:

Configure Authentication tab:
(This is my configuration but adjust it to your needs)
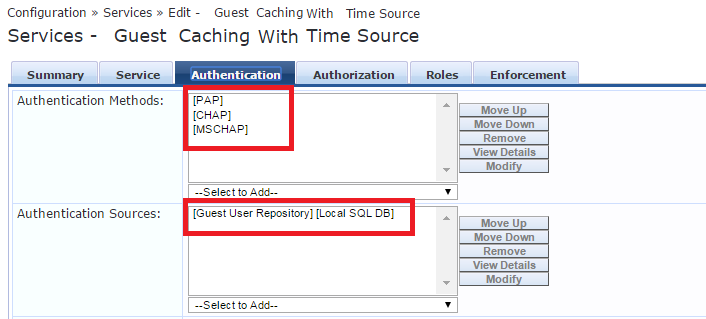
Configure Authorization tab:

Configure the Roles tab:

Configure the Enforcement tab:

Enforcement profile we created at the beginning of this tutorial should be added here, also in my
case i have one for role derivation and one more to update endpoint as known.
Congrats! All services are now completed.
What you want to do now is to connect to the Guest SSID which should be associated with those 2 services.
You can associate it by adding this string to both services on the service tab as a last condition.
Radius:Aruba | Aruba-Essid-Name | EQUALS | Guest |
Now open the access tracker and filter your test device MAC address only. Connect your device to the Guest SSID and watch the ''Guest MAC Authentication With Time Source'' service rejects (normal behavior).
Then you should be prompted with the captive portal, enter your credentials and post them.
If your account is enabled, still valid, matching a role ID from previous steps and you entered your credentials correctly, you should get an ACCEPT on the ''Guest Caching With Time Source'' service
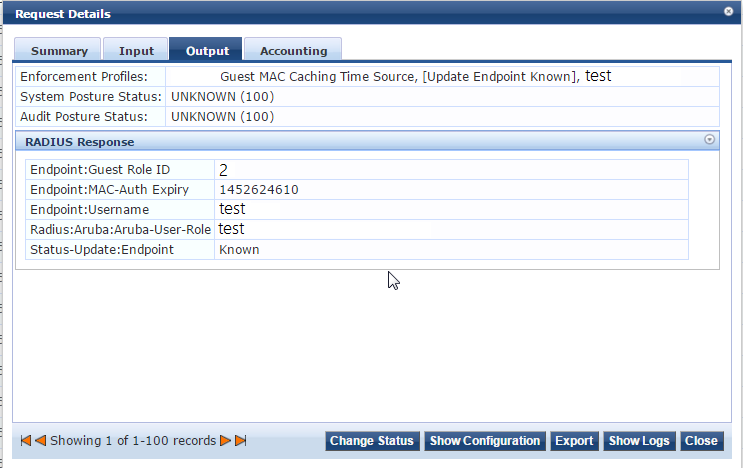
When you click on it, you can go to the Output tab and expand the RADIUS Response output
You can now see what the Endpoint will be updated with. This will be used as an authorization source for MAC Auth later on.
You can also go into Configuration -> Identity -> Endpoints
Enter the endpoint’s MAC and make sure it is updated.
Get yourself a well-deserved coffee because everything is now up & running :)