Product and Software: This article applies to all Aruba mobility controllers with ArubaOS 3.x.
To enable the captive portal authentication on the controller that does not have PEF license installed, follow these steps:
1) Create a captive portal profile.
From the GUI, navigate to:
Configuration > Security > Authentication > L3 authentication > Captiveportal Authentication profile > Create a new profile (dpak-portal) > Add > Apply > Save configuration.
For example:

From the CLI, execute the following commands:
(Aruba) #configure t
Enter Configuration commands, one per line. End with CNTL/Z
(Aruba) (config) #aaa authentication captive-portal dpak-portal
(Aruba) (Captive Portal Authentication Profile "dpak-portal") #write me
Saving Configuration...
Configuration Saved.
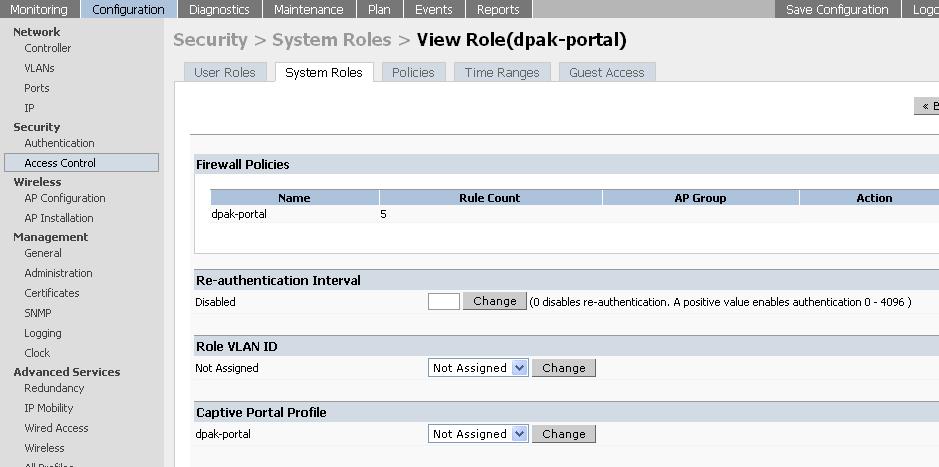
2) View the role that was created under the system role with the same name as captive portal profile.
From the GUI, navigate to:
Configuration > Security > Access control > System roles > dpak-portal > view
For example:

From the CLI, execute the following commands:
(Aruba) #show rights dpak-portal
Derived Role = 'dpak-portal'
Up BW:No Limit Down BW:No Limit
L2TP Pool = default-l2tp-pool
PPTP Pool = default-pptp-pool
Periodic reauthentication: Disabled
ACL Number = 24/0
Max Sessions = 65535
Captive Portal profile = dpak-portal
access-list List
----------------
Position Name Location
-------- ---- --------
1 dpak-portal
dpak-portal
-----------
Priority Source Destination Service Action TimeRange Log Expired Queue TOS 8021P Blacklist Mirror DisSca
n
-------- ------ ----------- ------- ------ --------- --- ------- ----- --- ----- --------- ------ ------
-
1 user mswitch svc-https permit Low
2 user any svc-http dst-nat 8080 Low
3 user any svc-https dst-nat 8081 Low
4 any any svc-dns permit Low
5 any any svc-dhcp permit Low
Expired Policies (due to time constraints) = 0
(Aruba) #
3) Check which AAA profile is mapped to the required ssid.
From the GUI, navigate to:
Configuration > AP configuration > Choose the APgroup > Edit > Wireless LAN > Virtual AP > Select the Virtual AP > Check the name of the AAA profile mapped to the ssid.
From the CLI, execute the following commands:
(Aruba) #show wlan virtual-ap
Virtual AP profile List
-----------------------
Name References Profile Status
---- ---------- --------------
default 1
Total:1
(Aruba) #show wlan virtual-ap default
Virtual AP profile "default"
----------------------------
Parameter Value
--------- -----
Virtual AP enable Enabled
Allowed band all
SSID Profile default
VLAN N/A
Forward mode tunnel
Deny time range N/A
Mobile IP Enabled
DoS Prevention Disabled
Station Blacklisting Enabled
Blacklist Time 3600 sec
Authentication Failure Blacklist Time 3600 sec
Fast Roaming Disabled
Strict Compliance Disabled
VLAN Mobility Disabled
AAA Profile default
4) Go to the AAA profile and map the new system role as an initial role in the AAA profile for the ssid.
From the GUI, navigate to:
Configuration > Security > Authentication > AAA Profiles > Click on the required AAA profile > On RHS from the drop-down menu, select the new system role as the initial role > Apply > Save configuration.
From the CLI, execute the following commands:
(Aruba) #configure t
Enter Configuration commands, one per line. End with CNTL/Z
(Aruba) (config) #aaa profile default
(Aruba) (AAA Profile "default") #initial-role dpak-portal
(Aruba) (AAA Profile "default") #write me
Saving Configuration...
Configuration Saved.
(Aruba) (AAA Profile "default") #show aaa profile default
AAA Profile "default"
---------------------
Parameter Value
--------- -----
Initial role dpak-portal
MAC Authentication Profile N/A
MAC Authentication Server Group default
802.1X Authentication Profile N/A
802.1X Authentication Server Group N/A
RADIUS Accounting Server Group N/A
User derivation rules N/A
Wired to Wireless Roaming Enabled
(Aruba) (AAA Profile "default") #
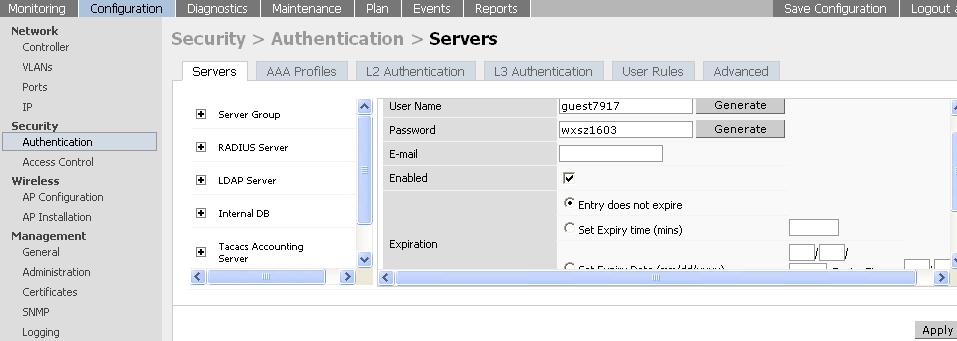
5) Create a user entry in the internal database of the controller.
From the GUI, navigate to:
Configuration > Security > Authentication > Internal DB > Add user > Type username and password > Apply button inside the window > outer Apply button > Save configuration.
For example:


From the CLI, execute the following command:
(Aruba) #local-userdb add username deepak password aruba