AOS 8.x - How to create a WLAN from scratch
This would be helpful for anyone new to AOS 8
We will be creating a WPA2 802.1x SSID for the below Network Setup, leveraging Clustering and L2 Mobility Master Redundancy based on ArubaOS Release 8.3.0.0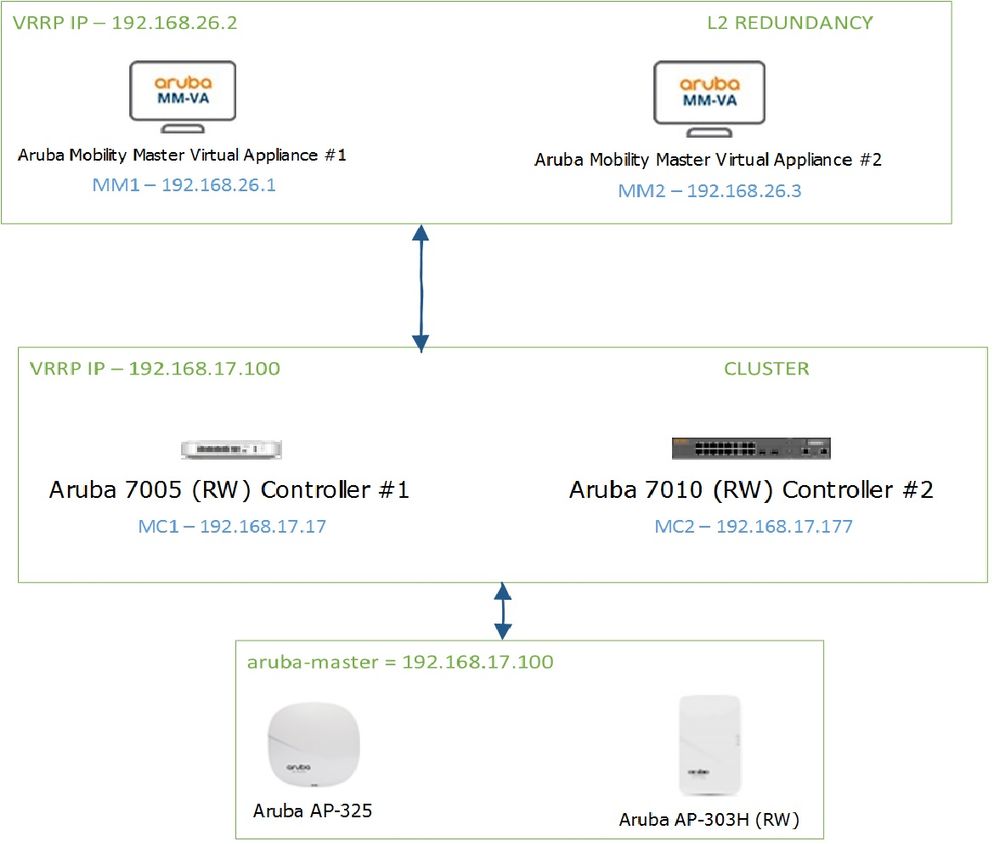
Deploying the Virtual Mobility Master with VMWare
Download the "ArubaOS_MM_8.3.0.0_64659.ova", from http://support.arubanetworks.com/
Open your vSphere Client and "Goto File -> Deploy OVF Template" and go through the wizard to get ArubaOS_MM_8.3.0.0_64659.ova deployed.
MM consumes 3 vCPU, 6GB RAM and 16 GB Storage.
Power ON the deployed Virtual Machine and MM by default boots from Partition 0
Fill in the start-up questions, below is how it looks. Once completed Mobility Master(MM1) will be UP.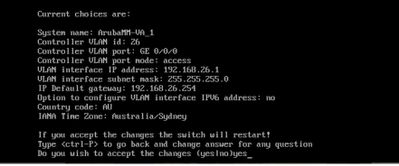
Use the above process and bring the other Mobility Master (MM2) as well.
Licensing the Mobility Master
Note: Just like licenses for Hardware Controllers are tied to Serial Number, the licenses for Virtual Machines are tied to "License Passphrase", which can be found at
Mobility Master -> Configuration -> System -> Licensing -> Mobility Master Licenses -> Click on + Sign
Your Virtual Machine licenses should be activated against "License Passphrase"
Once activated enter the license at
Mobility Master -> Configuration -> System -> Licensing -> Mobility Master Licenses -> Click on + Sign -> Paste the License.
My Mobility Master (MM1) has the following licenses.
Configuring L2 Mobility Master Redundancy
It involves two parts, one is configuring the VRRP and other is configuring the Master Redundancy.
Note: If you are deploying 2 MM on the same Virtual Machine, for the VRRP to work between them, please ensure "Promiscuous Mode: Accept" in that Virtual Machine Port Group.
Configuration -> Networking -> vSwitch0 -> Properties -> Select the Port Group -> And Edit its Properties.
Configuring VRRP:
Goto Actual Mobility Master (/mm/mynode) of MM1 and MM2
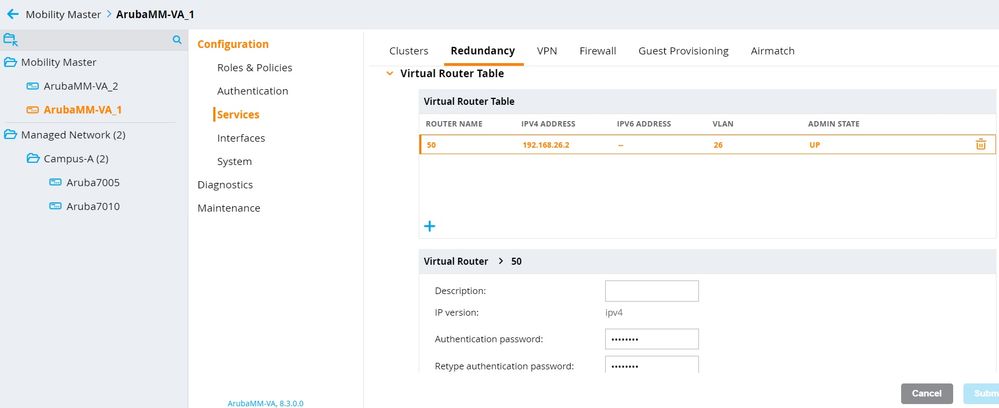
Navigate to Configuration -> Services -> Redundancy -> Virtual Router Table -> Click on the + sign
Configure the following values.
| MM1 | MM2 |
ID | 50 | 50 |
IP Version | V4 | V4 |
Authentication Password: | aruba123 | aruba123 |
IP Address: | 192.168.26.2 | 192.168.26.2 |
Priority: | 200 | 150 |
Admin State: | UP | UP |
VLAN: | 26 | 26 |
Master Redundancy
Goto Actual Mobility Master (/mm/mynode) of MM1 and MM2
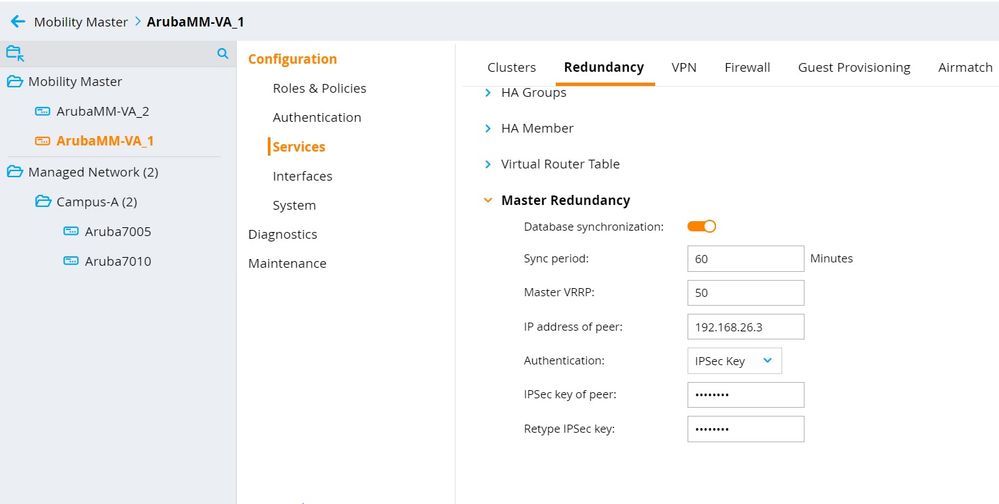
Navigate to, Configuration -> Services -> Redundancy -> Master Redundancy
| MM1 | MM2 |
Master VRRP: | 50 | 50 |
IP address of peer: | 192.168.26.3 | 192.168.26.1 |
Authentication: | IPSec Key | IPSec Key |
IPSec Key: | aruba123 | aruba123 |
Enable Database Synchronization:
Goto the MM (/mm) group above MM1 and MM2
Navigate to Configuration -> Services -> Redundancy -> Master Redundancy ->
Enable Database Synchronization
Sync Period: 60 minutes
Use “database-synchronize” command on Mobility Master, to force database synchronization on demand.
Final Screenshot
Verification Commands:
show vrrp
show database synchronize
show switches
Adding Mobility Controller to MM
Ensure the Mobility Controller (eg: 7010 Controller, 7005 Controller) has ArubaOS_8.3.0.0 image in one of the boot partitions and boot it from that partition.
One the Mobility Controller comes up, Fill in the start-up questions. Following is the screenshot.
Authorize the Mobility Controller in the Mobility Master.
Navigate to Mobility Master -> Configuration -> Controllers -> Local Controller IPSec Keys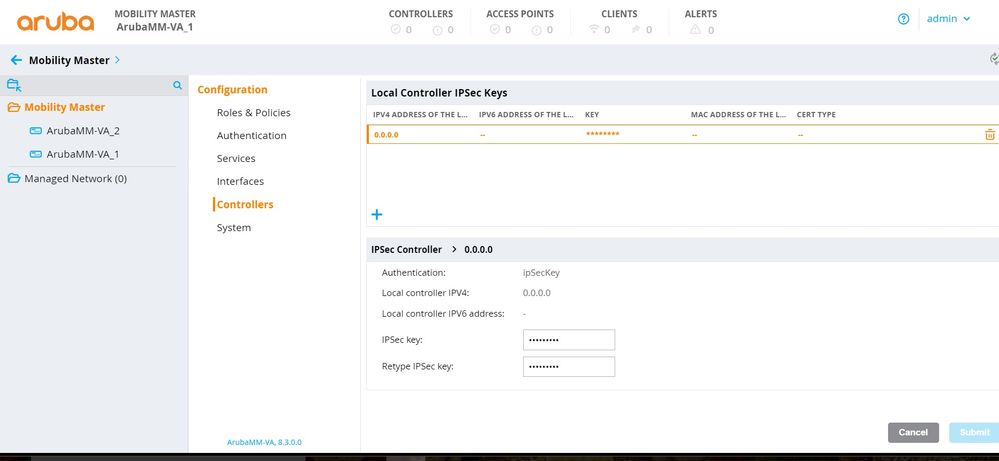
Create a Group “Campus-A”
Add the Controller into the Group (MAC Address can be got by typing "show inventory" on the Mobility controller)
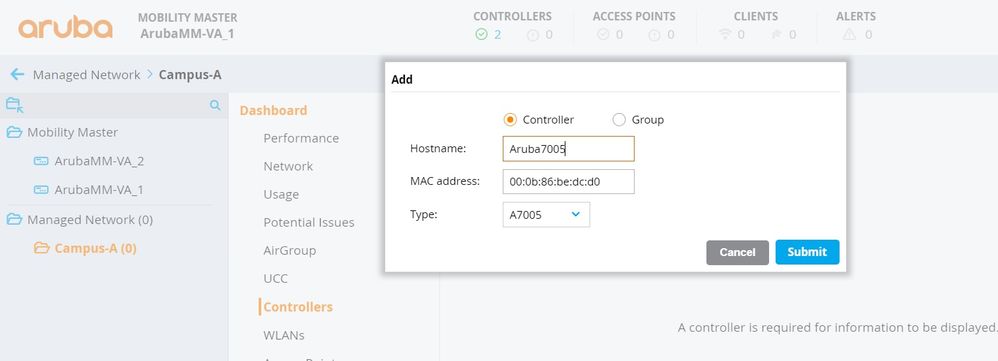
The Configuration Node Hierarchy and Inheritance
This can be viewed by using the following CLI command.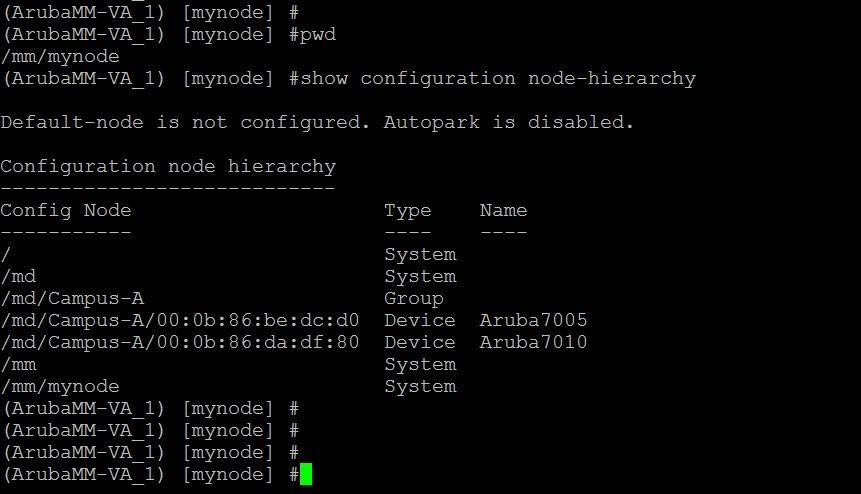
Creating a Cluster among the Mobility Controllers:
Creating a Cluster:
Navigate to Managed Network -> CampusA -> Configurations -> Services -> Clusters -> Click on + sign
Name: Campus-A-Cluster
On the Controllers Box, add both the Controllers.
| 7010 Mobility Controller | 7005 Mobility Controller |
IP Version: | V4 | v4 |
IP Address: | 192.168.17.177 | 192.168.17.17 |
Priority: | 200 | 200 |
Now Goto the Actual Mobility Controllers 7005 and 7010 (eg: /md/Campus-A/00:0b:86:be:dc:d0 )
Navigate to -> Configuration -> Services -> Cluster -> Cluster Profile
Cluster group-membership: Campus-A-Cluster
Exclude VLAN: 1
If all VLANs in Mobility Controller 1 (7010) can see all VLAN in Mobility Controller 2 (7005), then the Cluster is L2 Connected
If they can't see all the VLANs, but reachable to each other, then cluster is L3 Connected.
Can be verified at, Managed Networks -> Dashboard -> Cluster
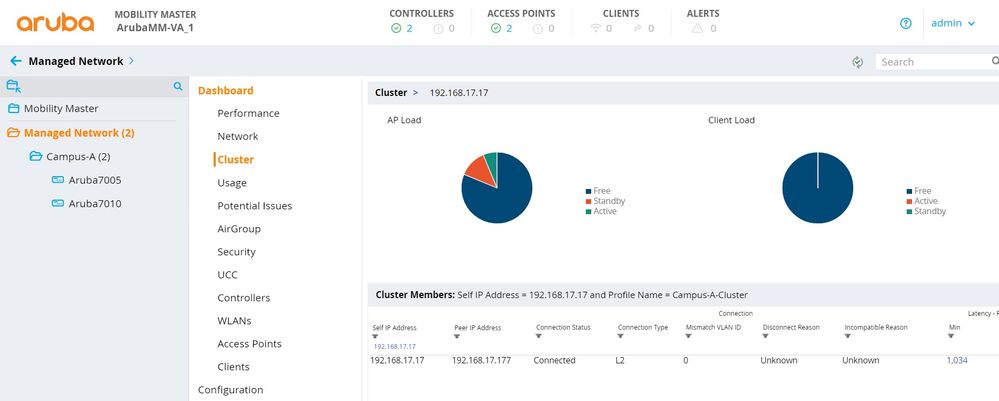
Provisioning APs:
For this “Campus-A” Group, I am going to "Enable auto cert provisioning"
Goto “Campus-A” Group -> Configuration -> System -> CPSec -> Control Plane Security -> Enable "Auto Cert Provisioning"
Set up VRRP between Mobility Controllers (7005 and 7010) in the cluster.
| 7010 Mobility Controller | 7005 Mobility Controller |
Vrrp id | 60 | 60 |
IP address | 192.168.17.100 | 192.168.17.100 |
authentication | aruba123 | aruba123 |
priority | 200 | 150 |
Admin State | UP | UP |
VLAN | 17 | 17 |
AP discovers the Controller using the following options.
- Static
- DHCP
- option 60 text ArubaAP
- option 43 text 192.168.17.100
- DNS
- By resolving "aruba-master" to 192.168.17.100
- ADP
Once the AP comes UP, it will fall into the default Group.
Verify whether the APs have come UP using the following command.
Creating a WPA2 802.1x SSID
Navigate to Campus-A -> Configuration -> AP Groups -> Click on + sign -> Add the Group "Global-AP-Group"
Goto Campus-A -> Configuration -> WLANs -> Click on + sign -> Run through the “New WLAN” Wizard
General Tab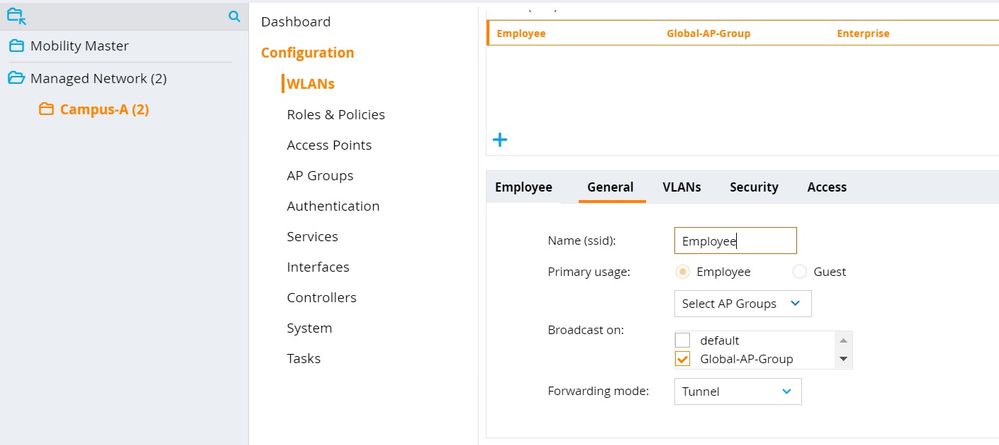
VLAN Tab
We have used the Named VLAN which was created at
Configuration -> Interfaces -> VLANs
VLAN name: EmployeeVLAN
VLAN ID: 17
This VLAN ID can be overwritten by the Mobility Controllers under the “Campus-A” Group
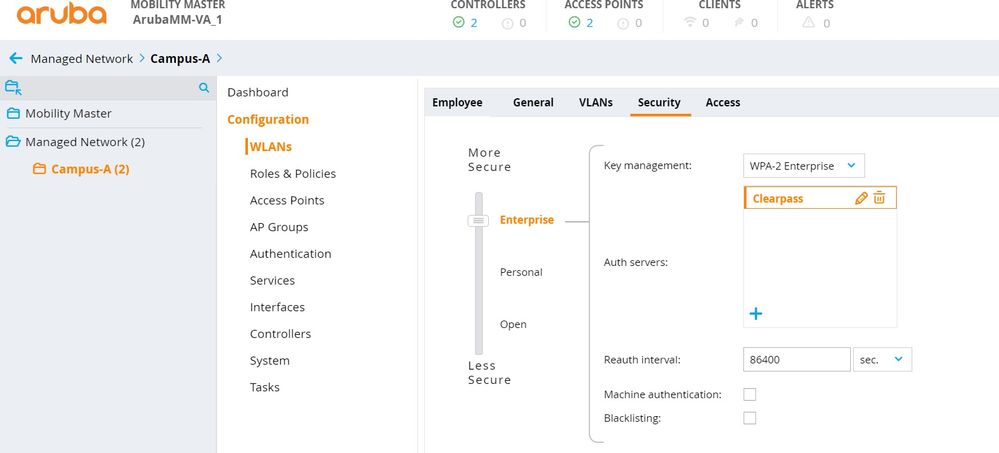
Security Tab:
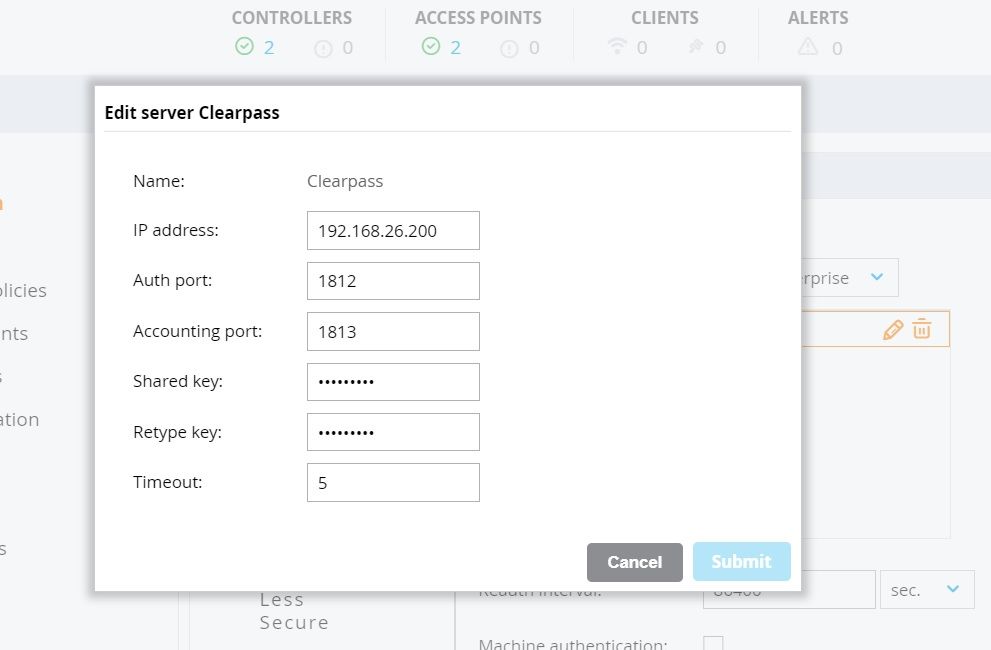
Select "Enterprise" level security and add the Clearpass Server.
Access Tab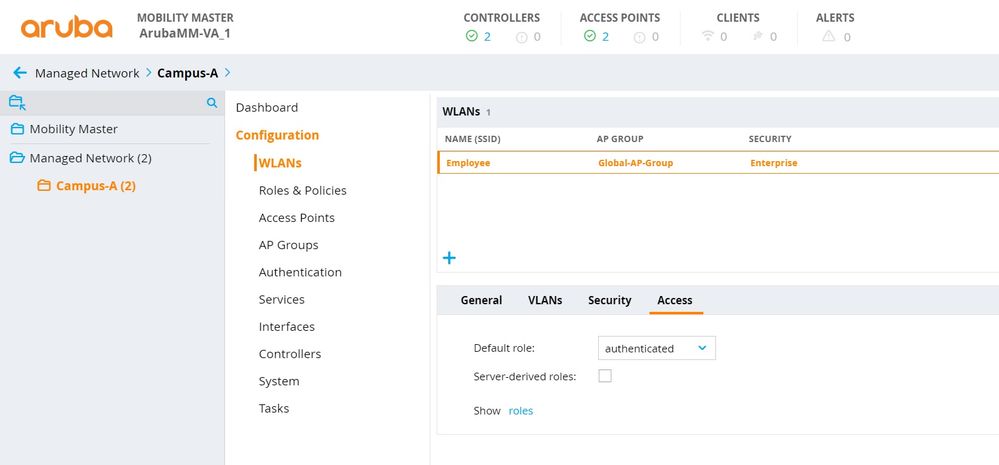
Once the WLAN is configured, Move the APs into the AP-Group you configured.
Goto Campus-A -> Configuration -> Access Points -> CampusAPs -> Select the APs -> Click on Provision and move it to the AP-Group (Global-AP-Group) you configured.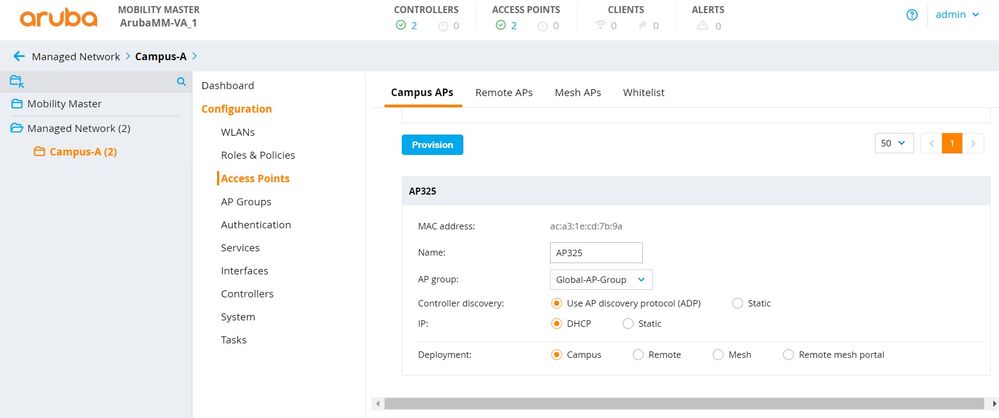
Verify the SSID is up at the Dashboard of the Campus-A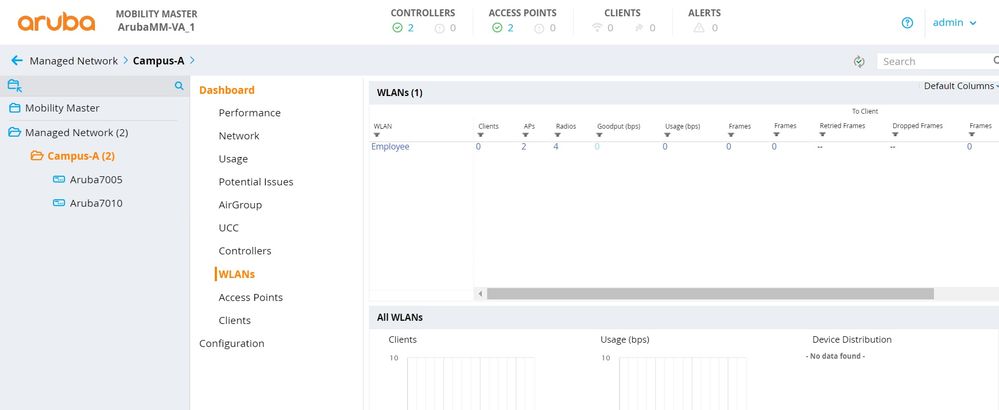
Connect your clients to the SSID and verify it in the Dashboard.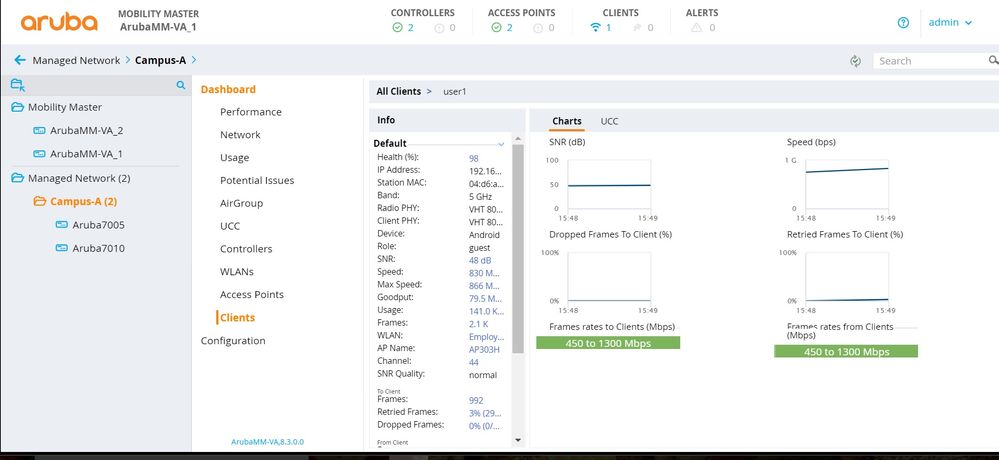
Hope you find this useful. Please post your feedback !
Regards,
Kapildev Erampu