Good day!
Prior condition or prerequisite:
Let's Start
Step1:Validate Radius-server is configured properly and radius-server trackable as expected.
BLDG02-F1(config)# radius-server host aoss-cppm.tmelab.net tracking enable vrf mgmt
BLDG02-F1(config)# radius-server host aoss-cppm.tmelab.net clearpass-username HELLOUSERNAME clearpass-password plaintext HELLOPASSWD vrf mgmt
BLDG02-F1(config)# radius-server host aoss-cppm.tmelab.net key plaintext KEYENTER vrf mgmt
BLDG02-F1(config)# radius-server tracking interval 60
BLDG02-F1# sh radius-server detail
******* Global RADIUS Configuration *******
Shared-Secret: None
Timeout: 5
Auth-Type: pap
Retries: 1
TLS Timeout: 5
Tracking Time Interval (seconds): 60
Tracking Retries: 5
Tracking User-name: radius-tracking-user
Tracking Password: None
Number of Servers: 1
****** RADIUS Server Information ******
Server-Name : aoss-cppm.tmelab.net
Auth-Port : 1812
Accounting-Port : 1813
VRF : mgmt
TLS Enabled : No
Shared-Secret : AQBapdAz4irjSK61Zg/CFArsNYWKbn1LObqDD/v9SH1eMQ6ABQAAADY26liu
Timeout (default) : 5
Retries (default) : 1
Auth-Type (default) : pap
Server-Group (default) : radius
Default-Priority : 1
Tracking : enabled
Tracking-Mode : any
Reachability-Status : reachable
ClearPass-Username : admin
ClearPass-Password : AQBapYv/u3/YfG9vYRpFxmOTtsFLIWxuAX442RdG9j11jsZ6CQAAACZ5Y2/BK9FmhQ==
BLDG02-F1#
BLDG02-F1# sh running-config interface mgmt
interface mgmt
no shutdown
ip static 10.6.8.13/24
default-gateway 10.6.8.1
BLDG02-F1#
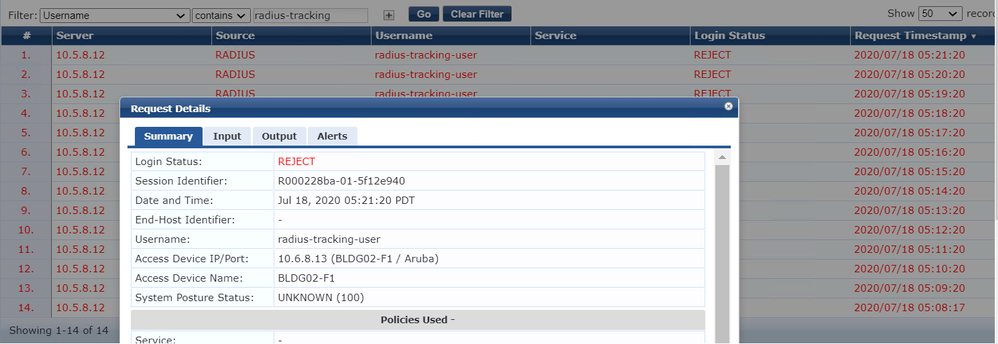
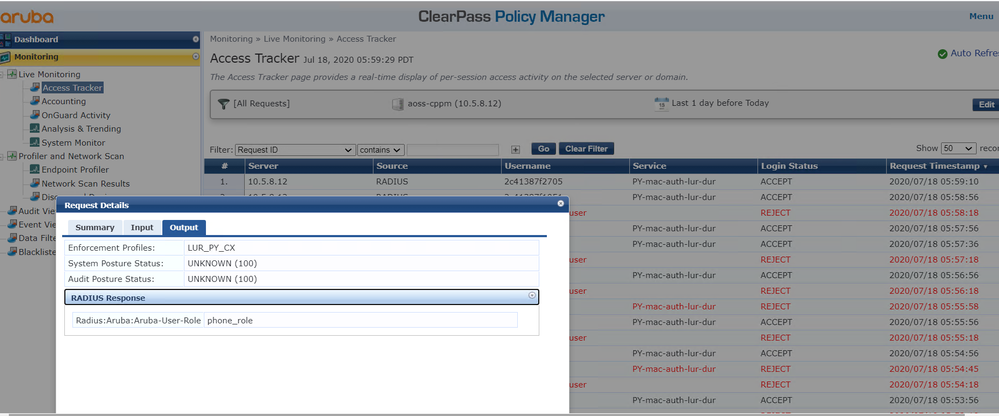
Note: I am using Aruba Clearpass as Radius-server, please find radius-tracking snapshot as below
Step2: Let's configure LUR on CX Switch
BLDG02-F1# sh running-config port-access
port-access role phone_role
description lur_mac_auth
auth-mode client-mode
client-inactivity timeout 400
poe-priority critical
reauth-period 3000
BLDG02-F1#
Step3: Let's enable authentication (mac-auth is enough for this case), let's enabled both dot1x and mac-auth.
BLDG02-F1(config)#aaa authentication port-access mac-auth enable
BLDG02-F1(config)# aaa authentication port-access dot1x authenticator enable
Step4: Let's enabled mac-auth on cliented connected interface.
BLDG02-F1# sh running-config interface 1/1/5
interface 1/1/5
no shutdown
vlan access 1
exit
BLDG02-F1# sh mac-address-table
MAC age-time : 300 seconds
Number of MAC addresses : 6
MAC Address VLAN Type Port
--------------------------------------------------------------
2c:41:38:7f:27:05 1 dynamic 1/1/5
90:20:c2:dc:85:00 195 dynamic 1/1/52
90:20:c2:dc:85:00 197 dynamic 1/1/52
90:20:c2:dc:85:00 198 dynamic 1/1/52
90:20:c2:dc:85:00 199 dynamic 1/1/52
90:20:c2:dc:85:00 200 dynamic 1/1/52
BLDG02-F1#
BLDG02-F1# sh running-config interface 1/1/5
interface 1/1/5
no shutdown
vlan access 1
exit
BLDG02-F1#
BLDG02-F1# conf t
BLDG02-F1(config)#
BLDG02-F1(config-if)#aaa authentication port-access mac-auth enable
BLDG02-F1(config-if)# end
BLDG02-F1# sh running-config interface 1/1/5
interface 1/1/5
no shutdown
vlan access 1
aaa authentication port-access mac-auth
enable
exit
BLDG02-F1#
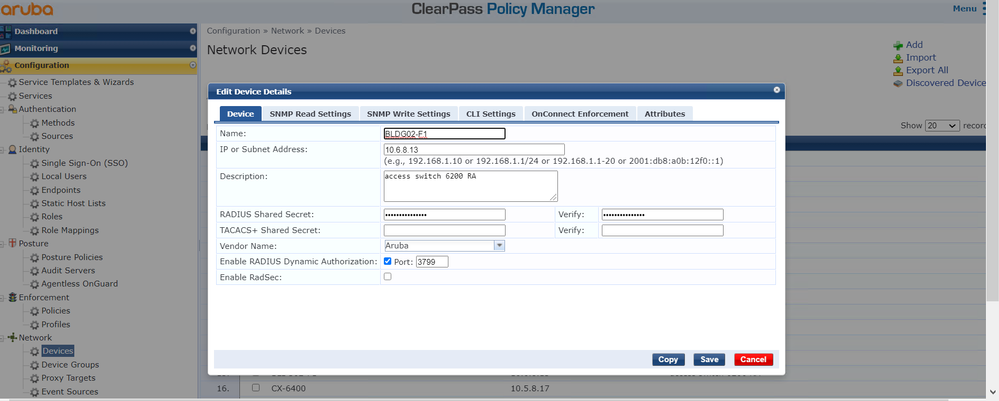
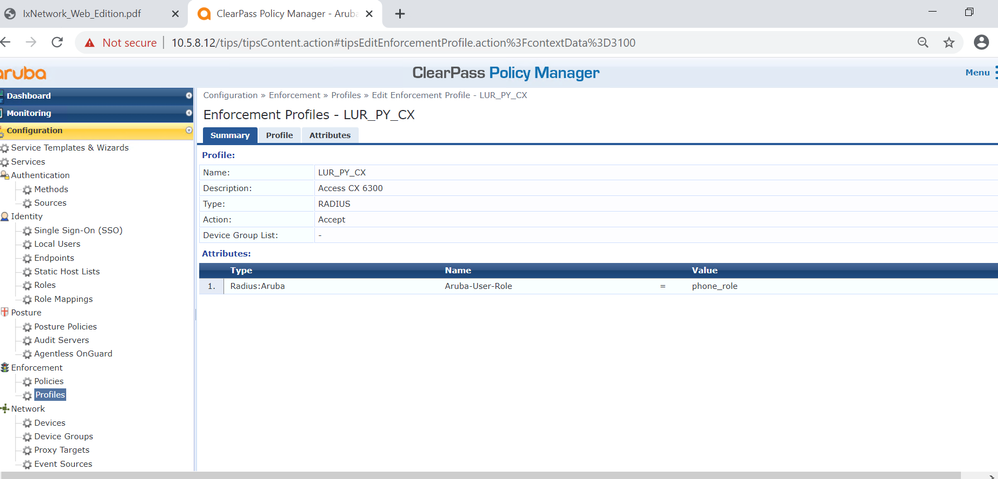
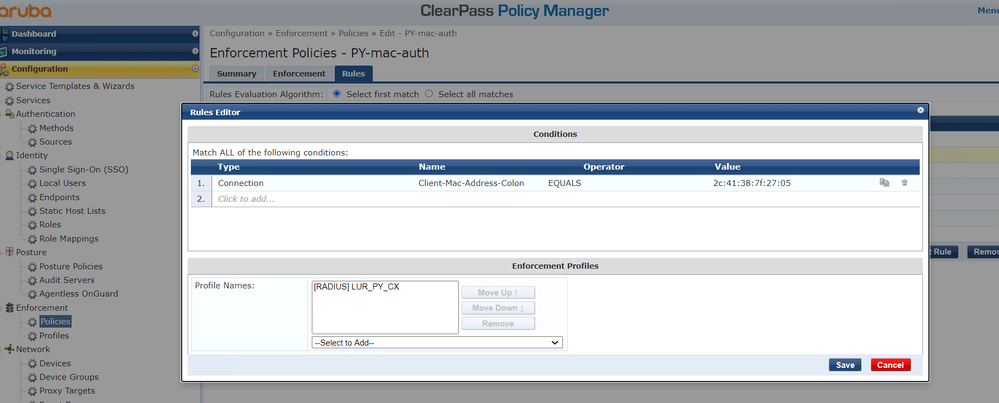
Step6: Let's add and configure CX switch, client Profiles, Policies and Services on Radius-server Clearpass.
Please note that same name as configured on CX switch is configured on radius-server. Screen snapshot is below:
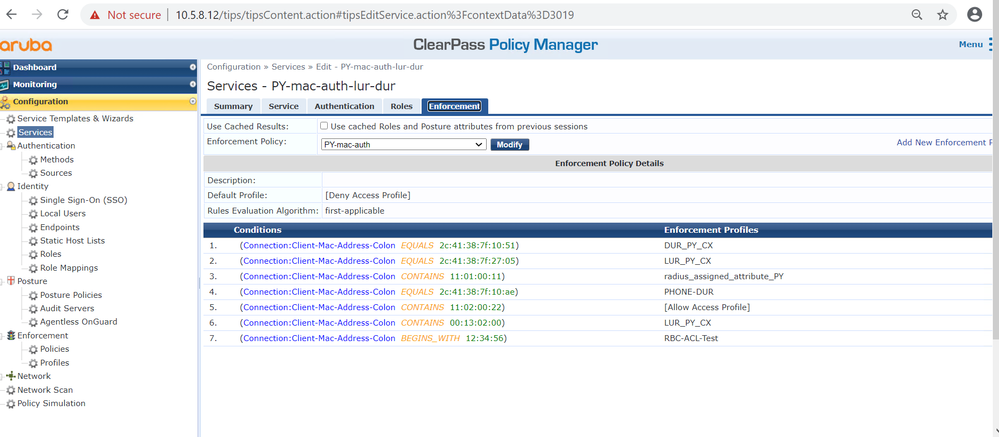
Step6: Time to validate, we are ready to authenticate mac-auth client and assigned LUR.
BLDG02-F1# sh port-access clients
Port Access Clients
--------------------------------------------------------------------------------
Port MAC Address Onboarded Status Role
Method
--------------------------------------------------------------------------------
1/1/5 2c:41:38:7f:27:05 mac-auth Success phone_role
BLDG02-F1# sh port-access clients interface 1/1/5
detail Show detailed Port Access Client information.
<cr>
BLDG02-F1# sh port-access clients interface 1/1/5 detail
Port Access Client Status Details:
Client 2c:41:38:7f:27:05, 2c41387f2705
============================
Session Details
---------------
Port : 1/1/5
Session Time : 172s
IPv4 Address :
IPv6 Address :
Authentication Details
----------------------
Status : mac-auth Authenticated
Auth Precedence : dot1x - Not attempted, mac-auth - Authenticated
Authorization Details
----------------------
Role : phone_role
Status : Applied
Role Information:
Name : phone_role
Type : local
----------------------------------------------
Reauthentication Period : 3000 secs
Authentication Mode : client-mode
Session Timeout :
Client Inactivity Timeout : 400 secs
Description : lur_mac_auth
Gateway Zone :
UBT Gateway Role :
Access VLAN :
Native VLAN :
Allowed Trunk VLANs :
Access VLAN Name :
Native VLAN Name :
Allowed Trunk VLAN Names :
MTU :
QOS Trust Mode :
STP Administrative Edge Port :
PoE Priority : critical
Captive Portal Profile :
Policy :
BLDG02-F1#
Thank you,
Yash