Hi guys
I just attended the Clearpass Essentials training (which I can highly recommend) and wrote this tutorial for me because I'm a big fan of step-by-step guides. It's nothing new but I couldn't find such a (correct) step-by-step guide which fullfilled my needs. And additionally the controller configuration part is missing in the training guides - I added it here in chapter 5. I'm sharing this and hope it's useful to you. Any feedbacks are welcomed!
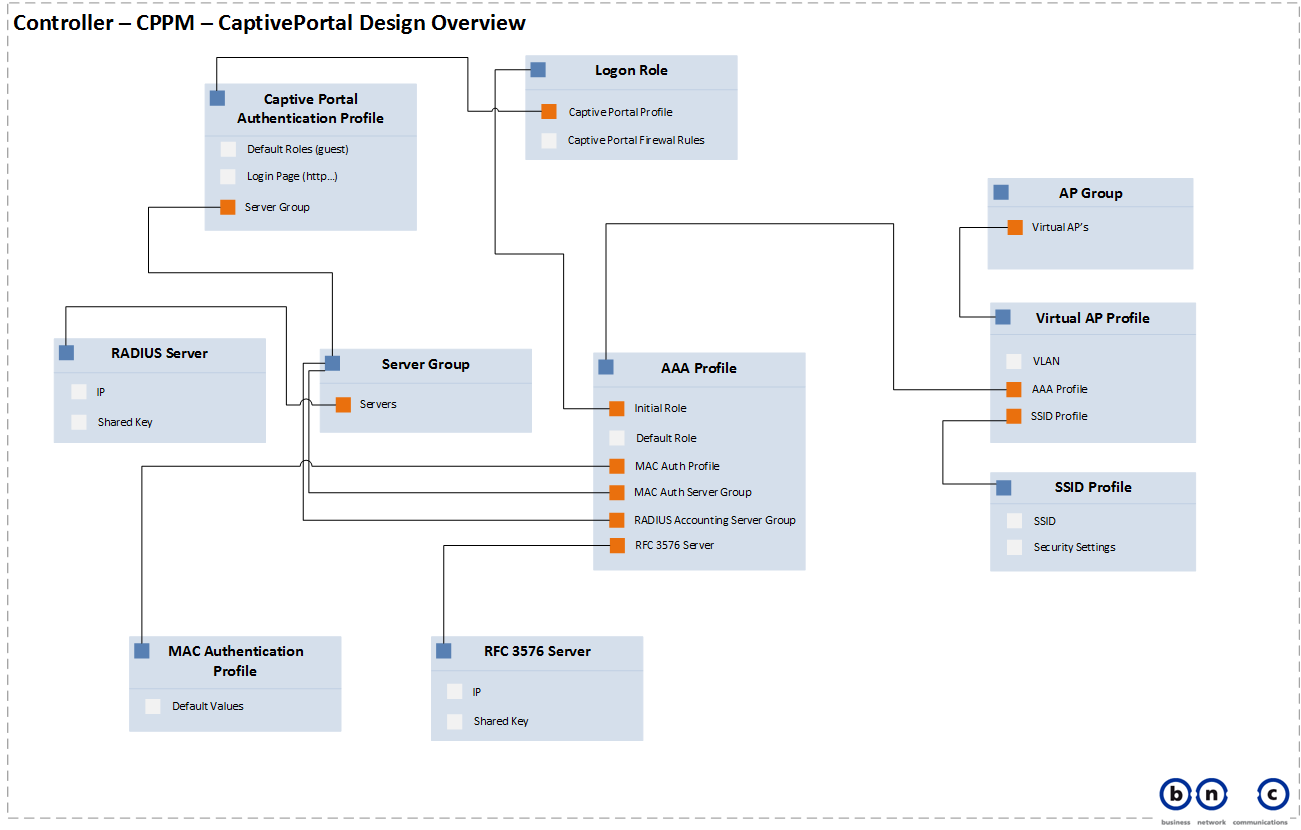
First, have a look at my Design Overview
This will help you understand, what is being configured in the controller (regarding the dependencies of the profiles)
Configuration Parameters
These are the values I will use in this tutorial. I summarize them here so you can use this section for preparing, adjusting and "re-finding" your values when you do your own implementation.
Aruba Clearpass Policy Manager, Version 6.5.0.71095
DNS Name: cppm.mycompany.com
IP MGMT: 10.10.100.2 / 255.255.255.0
IP DATA 192.168.1.2 / 255.255.255.0
NAD: myController, 10.10.100.1 with Shared Key aruba123
Service (RADIUS): Captive Portal MAC Authentication
Service (RADIUS): Captive Portal User Authentication with MAC Caching
Aruba Clearpass Guest, Version 6.5.0.71095
Name of the Web Login Page: Guest Network
Pagename of the Web Login Page: captiveportal (.php / is autom. added)
Aruba Controller, Version 6.3.1.5
Name: myController
IP (eth0): 10.10.100.1 / 255.255.255.0 (Subnet used for Management Traffic)
IP (eth1): 192.168.1.1 / 255.255.255.0 (Subnet used for Guest Networking)
Shared Secret: aruba123
RADIUS Server: myClearpass, 10.10.100.2 (MGMT IP of Clearpass), aruba123 (Shared Key)
RC 3576 Server: 10.10.100.2, aruba123 (Shared Key)
Server Group: Clearpass (Groupname)
L3 Authentication: CPPM_CaptivePortal (Profilename)
Captive Portal Login Page = https://192.168.1.2/guest/captiveportal.php
Auth Profile Server Group = Clearpass
User Role: captiveportal_logon
Policy Name: CaptivePortal-ACL
Policy Type: <Session>
Guest Profile: CaptPort-aaa_prof
MAC Authentication Profile: default
MAC Authentication Server Group: Clearpass
RADIUS Accounting Server Group: Clearpass
Virtual AP Profile: CaptPort-vap_prof
SSID Profile: CaptPort-ssid_prof
Now the Step-by-step tutorial begins:
1. Adding the Aruba Controller as NAD
- On Clearpass Policy Manager navigate to Configuration > Network > Devices
- Click
 on the top right
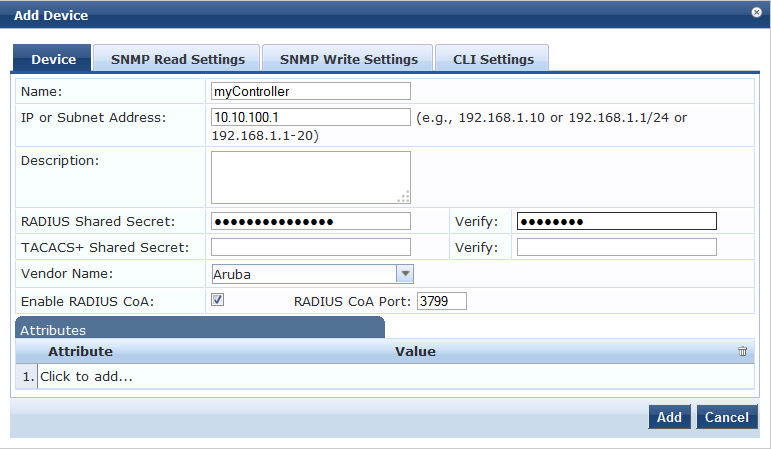
Use the following parameters:
Name: myController
IP or Subnet Address: 10.10.100.1
RADIUS Shared Secret: aruba123
- Click


- Done
2. Create the Guest Service
- On CPPM, navigate to Configuration > Start Here
- Select the Guest Authentication with MAC Caching Templat

- Fill in the template as follows:
General > Name Prefix: Captive Portal
Wireless Network Settings > Wireless SSID: Guest-SSID
Wireless Network Settings > Select Wireless Controller: myController
MAC Caching Settings > Cache duration for Guest: One Day
Access Restrictions > Enforcement Type: Aruba Role Enforcement
Access Restrictions > Captive Portal Access: captiveportal_logon
Access Restrictions > Maximum number of devices allowed per user: 1
Access Restrictions > Guest Access: guest
Leave the the rest of the fields blank or by default. Change values for ”Cache duration for Guest” and “Maximum number of devices allowed per user” at your discretion
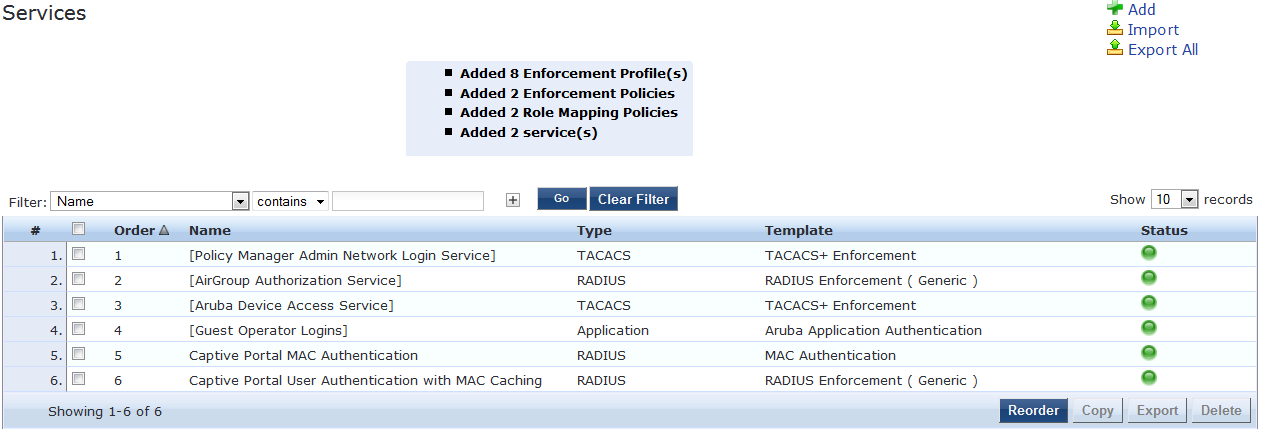
- Click

- You don’t have to reorder the services as long as there are no other services interfering with the newly created
3. Create the Captive Portal Page
- In CPPM Guest navigate to Configuration > Pages > Web Logins
- Click
 on the top right
- Enter the following parameters:
Name: Captive Portal
Page Name: captiveportal (This will set the URL to: https://cppm.mycompany.com/guest/captiveportal.php)
Vendor Settings: Aruba Networks (is the default)
Address: securelogin.arubanetworks.com (is the default, is used to avoid certificate errors)
Authentication: Credentials – Require a username and password (is the default)
Pre-Auth Check: Local – match a local account
Customize the Loging Page at your discretion. Give it at least a meaningful “Title”.
- Click

4. Create a Guest User
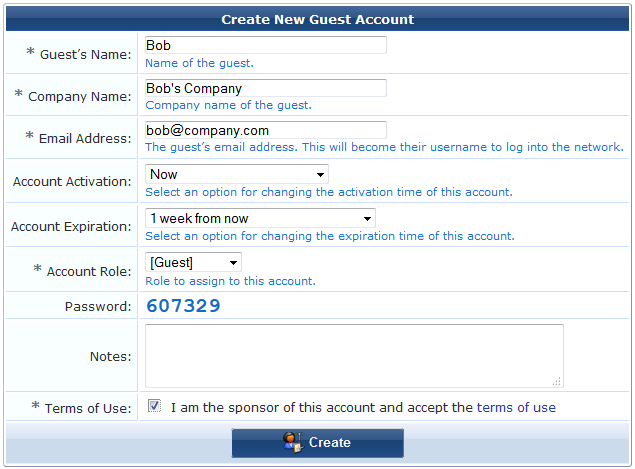
- In CPPM Guest navigate to Guest > Start Here and click on Create New Guest Account
- Fill in some adequate values and click on Create:
5. Configuring the Aruba Controller
5.1 Add Clearpass as RADIUS Server
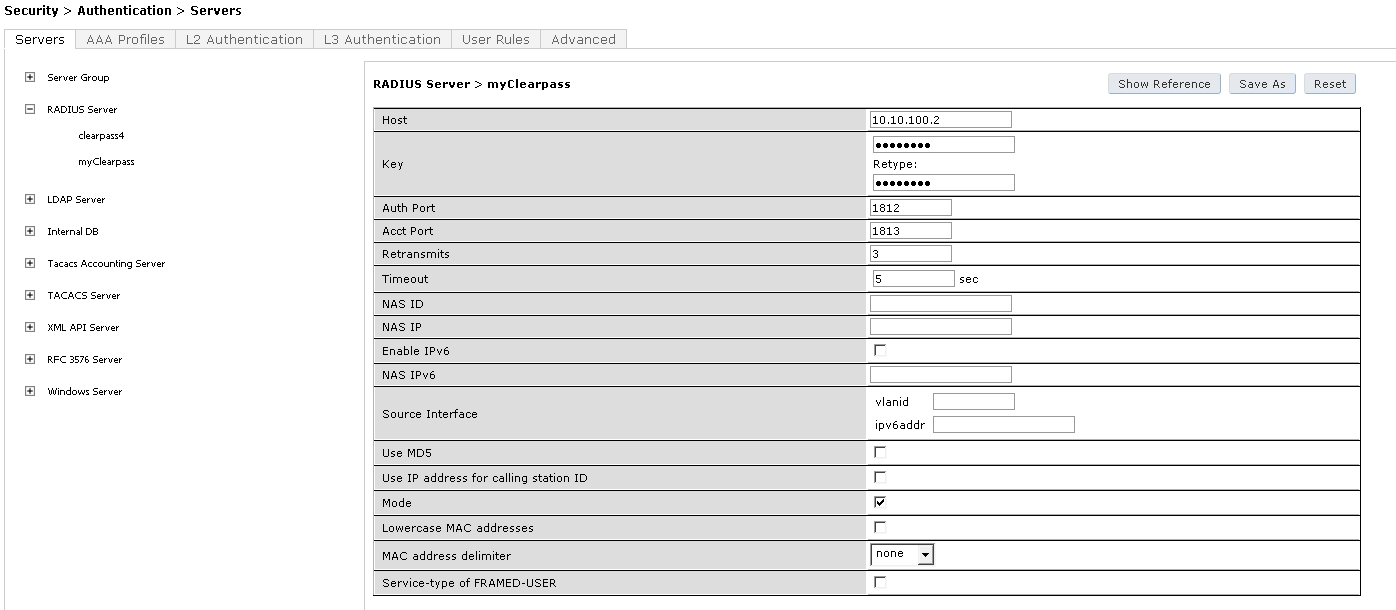
- Navigate to Configuration > SECURITY > Authentication > Servers
- Click on RADIUS Server and enter the Name of your Clearpass Server: myClearpass
- Click Add
- Click on myClearpass in the Server List and enter:
Host: 10.10.100.2 (MGMT IP of Clearpass)
Key: aruba123 (Shared Key between Controller and Clearpass)
Leave the other fields by default
- Click Apply
5.2 Add Clearpass as RFC 3576 Server
- Navigate to Configuration > SECURITY > Authentication > Servers
- Click on RFC 3576 Server and enter the MGMT IP of Clearpass: 10.10.100.2
- Click Add
- Click on 10.100.2 in the list
- Enter the Shared Key aruba123 twice again
- Click Apply

5.3 Create a Server Group for Clearpass
- Navigate to Configuration > SECURITY > Authentication > Servers
- Click on Server Group and enter a reference name for your Clearpass server group: Clearpass
- Click Add
- Click on Clearpass and click New in Servers
- Select your Clearpass Server from the Dropdown List: myClearpass
- Click Add Server
- Click Apply at the bottom of the page to save the changes

5.4 Configure the Captive Portal / L3 Authentication
- Navigate to Configuration > SECURITY > Authentication and click on L3 Authentication
- Click on Captive Portal Authentication Profile
- Enter a new Captive Portal profile name: CPPM_CaptivePortal in the empty box and click Add
- Select CPPM_CaptivePortal and edit the following parameter:
Login page: https://192.168.1.2/guest/captiveportal.php
- Make sure that “Default Role” = guest and “Default Guest Role” = guest
- Click Apply at the bottom of the page to save the changes
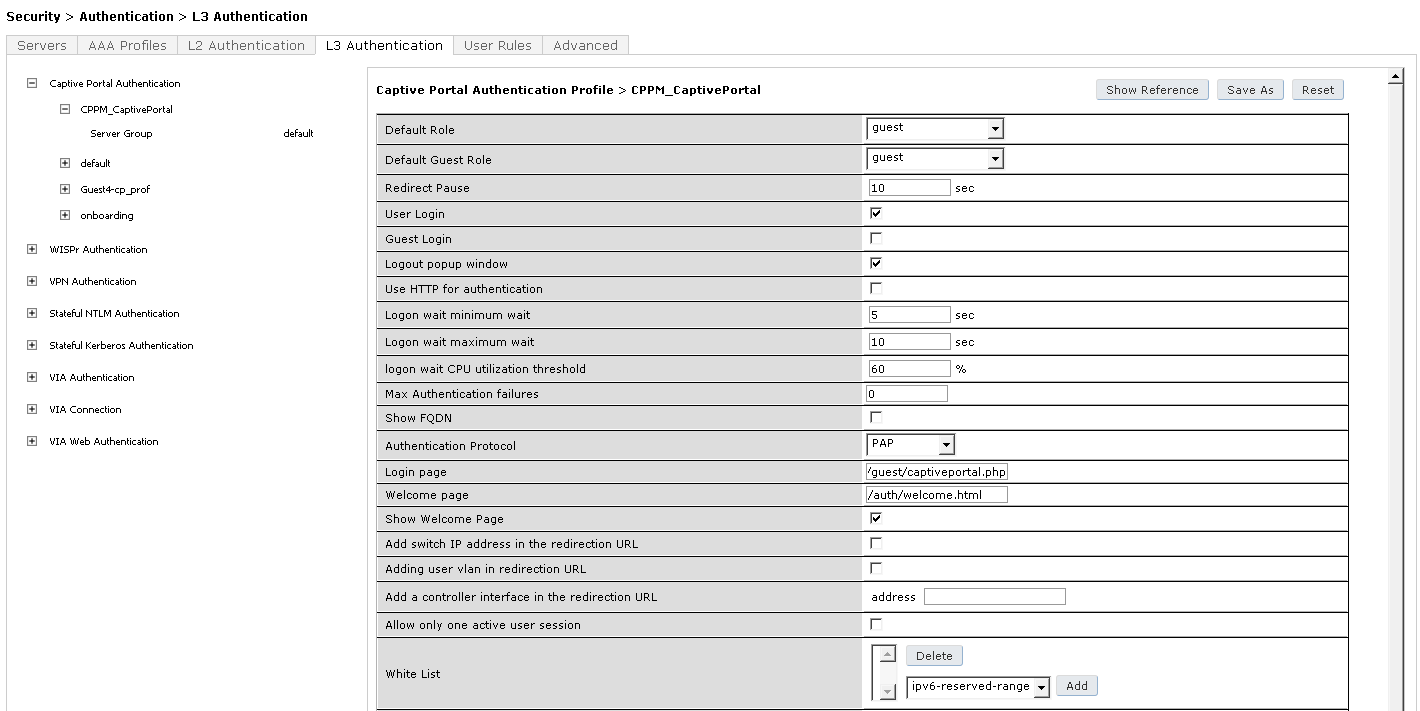
- Click on Server Group under the CPPM_CaptivePortal and change the Server Group from default to Clearpass
- Click Apply at the bottom of the page to save the changes

5.5 Create the Captive Portal (Logon) Role
- Navigate to Configuration > SECURITY > Access Control > User Roles and click Add
- Name it captiveportal_logon for the Role Name under Firewall Policies
- Click Add
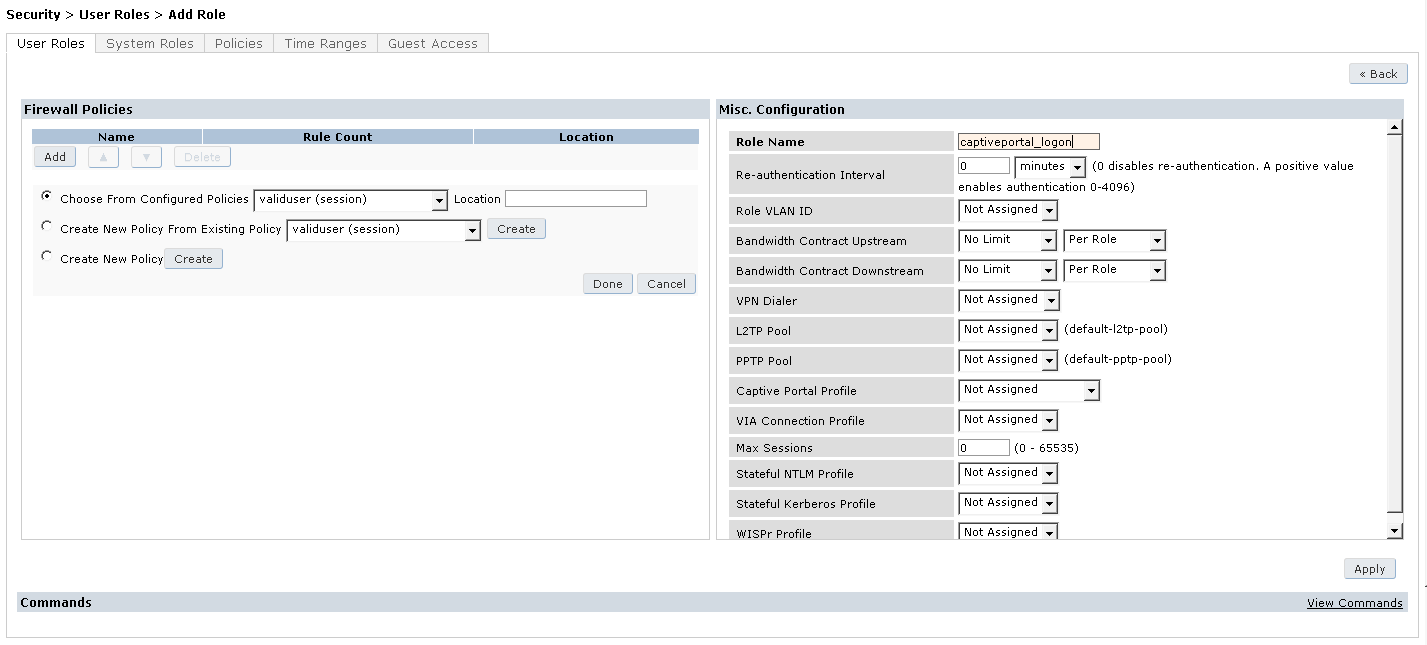
- Choose the radio button for Create New Policy and click the Create Button
- Enter the following:
Policy Name: CaptivePortal-ACL
Policy Type: <Session>
- Click Add
- Select and enter the following information for the first line of the ACL:
IP Version: IPv4
Source: <USER>
Destination: host, Host IP: 192.168.1.2 (IP of Clearpass)
Service: service -> svc-http (80)
Action: permit
- Click Add at the far right underneath this rule
- Click Add again
- Select and enter the following information for the first line of the ACL:
IP Version: IPv4
Source: <USER>
Destination: host, Host IP: 192.168.1.2 (IP of Clearpass)
Service: service -> svc-https (443)
Action: permit
- Click Add right underneath this rule
- Click Done
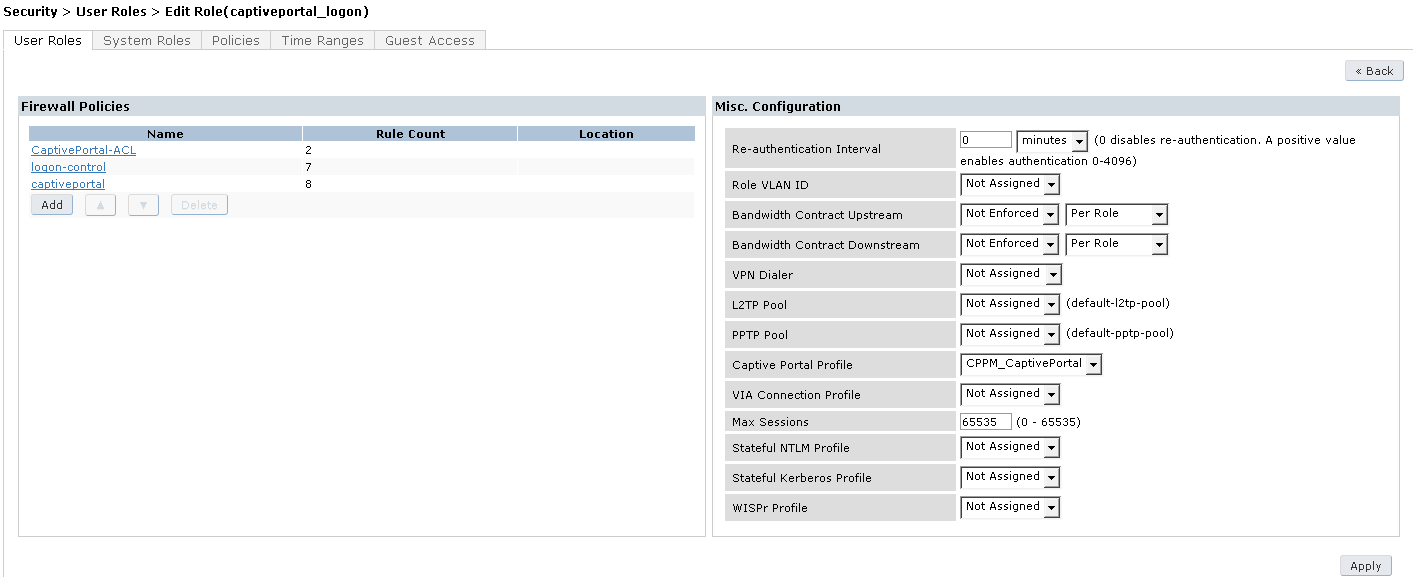
- Click Add under Firewall Policies and select Radio Button for Choose From Configured Policies
- Select logon-control (session) and click Done
- Click Add again under Firewall Policies and select Radio Button for Choose From Configured Policies
- Select captiveportal and click Done
- Make sure that captiveportal policy is at the bottom of the list
- Right in Configuration select under Captive Portal Profile the newly created CPPM_CaptivePortal
- Click Apply at the bottom of the page
5.6 Configure the Guest Captive Portal AAA Profile
- Navigate to Configuration > SECURITY > Authentication > Servers and click on AAA Profiles
- Click Add
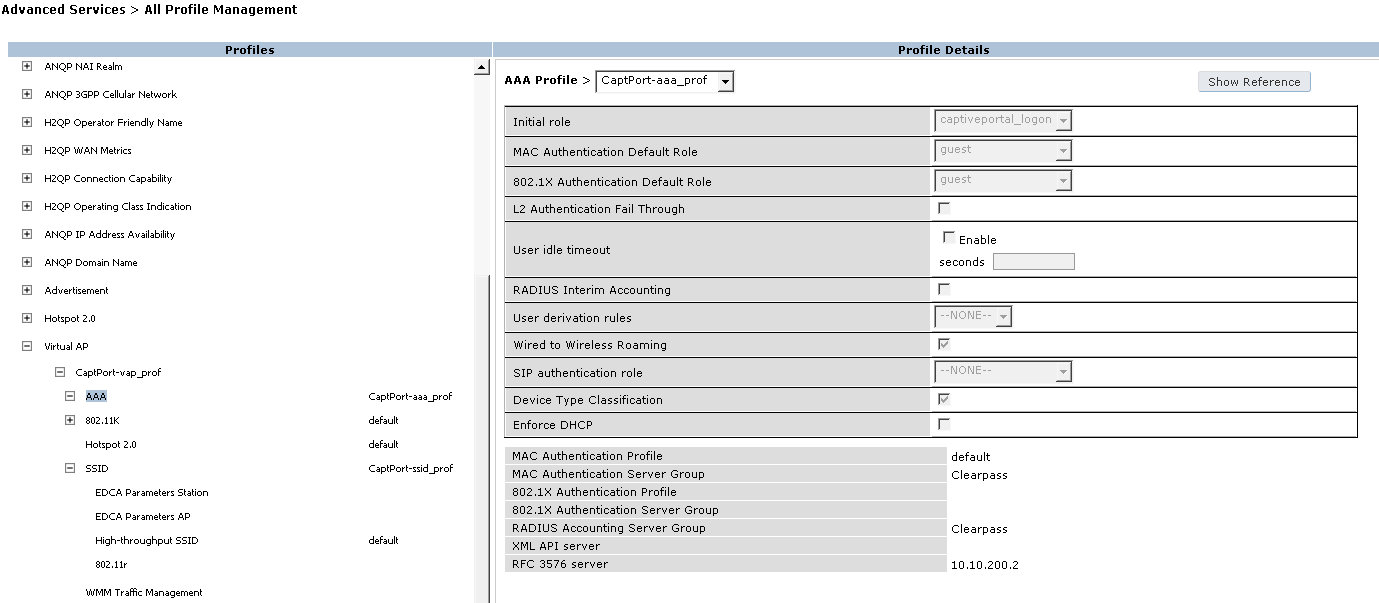
- Enter a name for the ClearPass Guest Profile: CaptPort-aaa_prof and click Add again
- Click on CaptPort-aaa_prof and change the Initial Role to captiveportal_logon and click Apply

- Click on MAC Authentication and set MAC Authentication Profile to default and click Apply
- Click on MAC Authentication Server Group, set it to Clearpass and click Apply
- Click on RADIUS Accounting Server Group, set it to Clearpass and click Apply
- Click on RFC 3576 Server, select 10.100.2 from the Add a profile list, click Add and click Apply

5.7 Configure the Guest Captive Portal SSID
- Navigate to Configuration > Advanced Services > All Profiles
- Expand the Wireless LAN section and click on Virtual AP
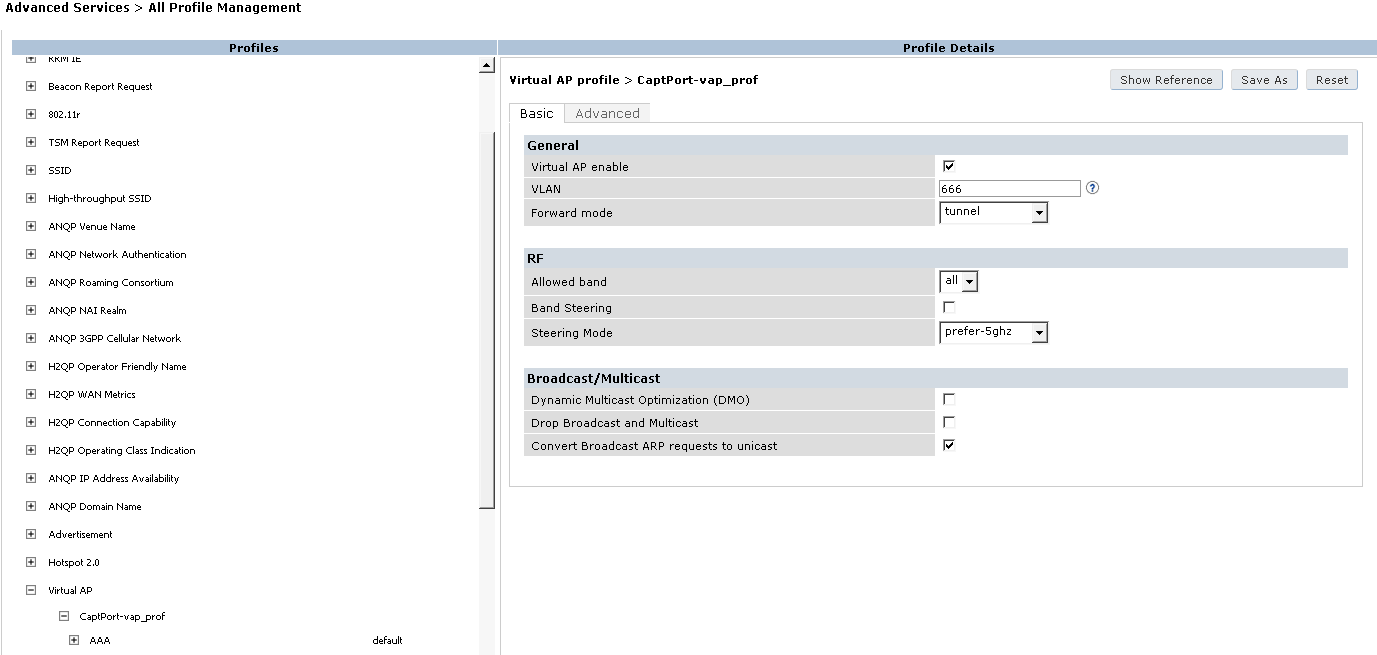
- Enter a name for the Virtual AP profile: CaptPort-vap_prof and click Add
- Click on CaptPort-vap_prof to edit it
- In the Basic Tab, et the VLAN to your Guest VLAN (if used) and click Apply
- Click on SSID (on the left under the CaptPort-vap_prof profile)
- Click on –New-- in SSID Profile > and name it CaptPort-ssid_prof
- Set the Network Name (SSID) to Guest-SSID
- Leave Network Authentication to None and Encryption to Open, click Apply
- Click on AAA set the AAA Profile from default to CaptPort-aaa_prof and click Apply
- Navigate to Configuration > WIRELESS > AP Configuration and select your AP Group
- Click on Wireless LAN > Virtual AP and select CaptPort-vap_prof from the Add a profile list and click Add
- Click Apply
5.8 Save the Configuration
- Click on Save Configuration on top of the page and you’re ready to test your Captive Portal!