Controller-less WLANs

 View Only

How to Create a Certificate for Instant Captive Portal using Open SSL and a Certificate Authority 

Sep 28, 2016 08:16 PM

Creating and Installing a Captive Portal Certificate on Instant from a Public CA


Due to the Advisory here:  https://community.arubanetworks.com/t5/Controller-less-WLANs/ArubaOS-Default-Certificate-Revocation-FAQ-Instant/ta-p/275814 all users should be uploading either a self-signed or CA certificate on instant.  Below are instructions for a public CA.  Please keep in mind that instant does not have a facility to create a CSR or certificate signing request that is needed for a CA, so you have to create your own using OpenSSL.  Open SSL can be downloaded here:  https://wiki.openssl.org/index.php/Binaries 


Steps:


Create a CSR to submit to your Certificate Authority by typing the following on the commandline:


 openssl req -newkey rsa:2048 -keyout privatekey.key -out mycsrfile.csr


You should see the following happen:


Generating a 2048 bit RSA private key

...........................+++

.....................................................................................+++

writing new private key to 'privatekey.key'

Enter PEM pass phrase:          [Enter private key passphrase twice.  You will need it later, so remember it!]

Verifying - Enter PEM pass phrase:

-----

You are about to be asked to enter information that will be incorporated

into your certificate request.

What you are about to enter is what is called a Distinguished Name or a DN.

There are quite a few fields but you can leave some blank

For some fields there will be a default value,

If you enter '.', the field will be left blank.

-----

Country Name (2 letter code) [AU]:US

State or Province Name (full name) [Some-State]:NY

Locality Name (eg, city) []:NY

Organization Name (eg, company) [Internet Widgits Pty Ltd]:Company

Organizational Unit Name (eg, section) []:IT

Common Name (e.g. server FQDN or YOUR name) []:instant.mydomain.com

[instant.mydomain.com will be the fqdn of your server certificate]

Email Address []:admin@mydomain.com


Please enter the following 'extra' attributes

to be sent with your certificate request [optional….can be skipped]

A challenge password []:

An optional company name []:

In the same directory, you should find two files:

  1. key, which is your private key (you will need this later, along with the passphrase you entered twice)
  2. csr which is what you will upload to the CA, either by opening with a text editor and copying and pasting or by uploading the mycsrfile.csr to the CA that will issue your server certificate.


Upload or copy and paste the contents of the mycsrfile.csr to the certificate authority when it asks you to.  After you do that certificate authority will either allow you to download or will email you two files:


  • The server certificate
  • The full certificate chain of the CA.


To put it into the proper format, you need to open the two text files the CA gives you back, along with the privatekey.key file in a text editor.  Also, create a new blank text file that you will be copying and pasting all of the files into:


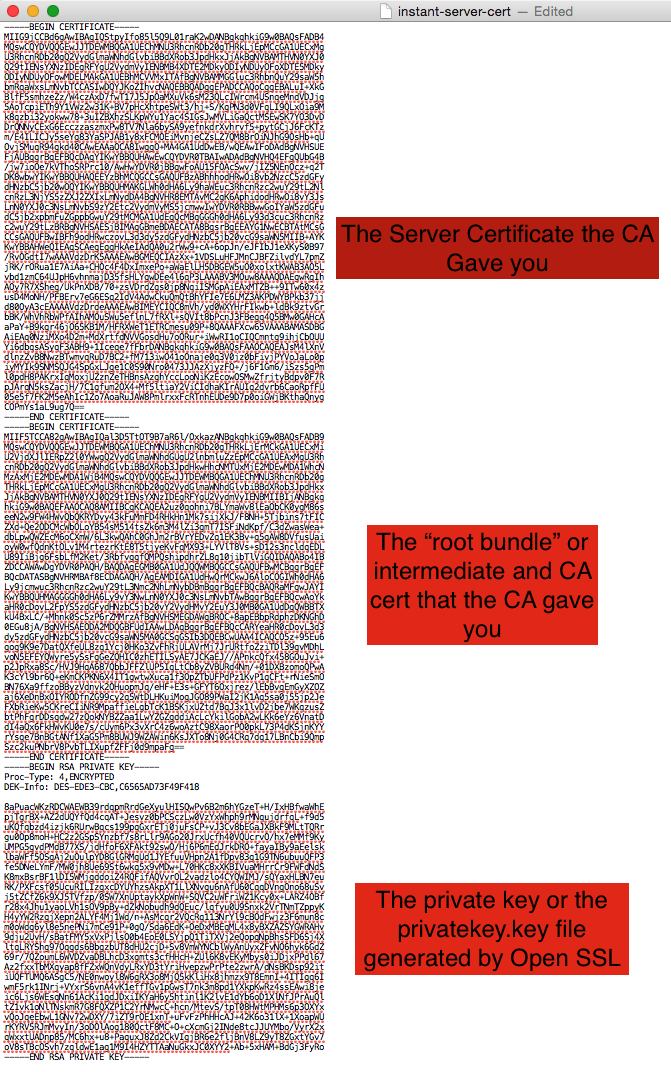
Using a text editor, Copy and paste the contents of the  three files in this order into a blank text editor page:


  1. The server certificate that the CA gave you
  2. The intermediate and CA cert file the CA gave you (the root bundle).
  3. The contents of the privatekey.key file 

It should look something like this:
combine-certs.png

Save the text file with a .pem extension as instant-server-cert.pem


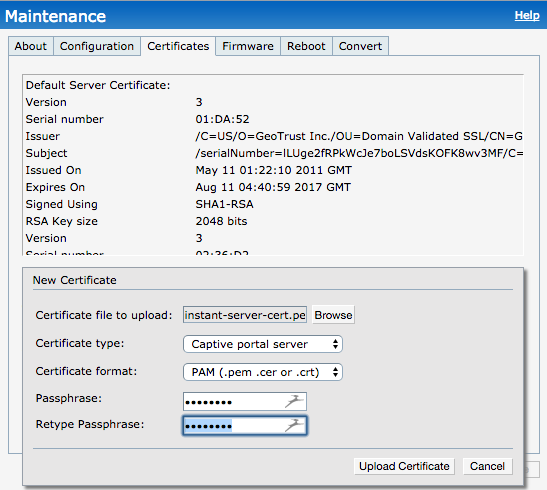
Login to your Instant controller and the go to Maintenance> Certificates and click on Upload New Certificate:
 

upload.png


For Certificate Type, choose Captive Portal Server.  For Certificate format, choose PAM.  Click on Browse to browse to your instant-server-cert.pem file.  Type in the passphrase that you chose when you ran the open SSL command above twice.  Click on upload certificate.


The instant controller GUI will be unavailable for up to 60 seconds.  Wait, and then refresh the page.  You should be able to inspect your SSL certificate in the browser when the GUI returns.

Statistics
0 Favorited
377 Views
0 Files
0 Shares
0 Downloads

Comments

Feb 08, 2018 05:27 PM

After looking through this and the linked similar case, it's actually simple but very non-standard.


1.  create a file that combines the cert and the private key (non-encrypted, which is typical): 

cat put-your-cert-here.pem put-your-private-key-here.pem > aruba.pem

2.  Upload that.  Wait a while (a long while if it's a 4096 bit cert).

Jan 08, 2018 07:38 PM

We had the same issue as @maulerma above, where we had the private key header as "-----BEGIN ENCRYPTED PRIVATE KEY-----". I believe this PKCS#8 format, which the IAP seems to cough on. (We got a "parse" error in the log, and couldn't access the GUI when using this)


We used "openssl rsa -in old_private_key.pem -out new_private_key.pem" to convert to the "-----BEGIN RSA PRIVATE KEY----- " form (which is the old style PKCS#1).


Anyway this seemed to work, so thanks Manfred.

May 26, 2017 04:24 AM

I had an upload certificate issue. It was due to an extra line at the bottom of the .pem file. Very helpful support were able to see this for me. The privatekey.key file was also encrypted which was fine. You don't need to unencrypt

Apr 12, 2017 09:55 AM

SOLVED:


It is NOT possible to use the encrypted privatekey.key and use the passphrase fields in the WebUI!


I had to import the encrypted privatekey.key file with OpenSSL and generate an unencrypted privatekey_unenc.key file - inserted the content it at the end of the .pem file and did NOT enter any passphrase during the installation - that worked for me.


Manfred


PS:

The header of my privatekey_unec.file looks like:

-----BEGIN RSA PRIVATE KEY-----
MIIEpQIBAAKCAQEA0vIiLW3AIiu2hV3kfKJamUr1Kdkwy5UtbWNrqzwgugCk/+Jm
lr/OLD7Qo9xZKjNxvDlYYbprX1FyWxya8YQmvjCS0K6wE9P3ewr2eYzSsjgyTRTV

.

.

-----END RSA PRIVATE KEY-----

Apr 12, 2017 07:03 AM

As noted in article http://community.arubanetworks.com/t5/Controller-less-WLANs/Certificate-chain-hierarchy-recommended-for-Instant-AP/ta-p/292008 I've added also the root certificates in the certificate chain but I'm getting the same error message:


I have a Geotrust G3 certificate and have now 4 certificates in the PEM file in the following order:

SSL certificate

Intermediate Geotrust CA G3 certificate

Primary GeoTrust Universal certificate

Private Key


Help is still very welcome---


Manfred


Apr 12, 2017 03:53 AM

Hi!

I have tried this too using the above description and got the following error during installing the certificate:


cert_upload_error.png

The Header of the privatekey.key File looks different from the above example:


-----BEGIN ENCRYPTED PRIVATE KEY-----

MIIFHDBOBgkqhkiG9w0BBQ0wQTApBgkqhkiG9w0BBQwwHAQIZZQ/fa3YPbMCAggA

MAwGCCqGSIb3DQIJBQAwFAYIKoZIhvcNAwcECPiKwt/cmxftBIIEyNg53Fmauz/O


...but this is the content of the file generated by OpenSSL.


Can you please give me a hint or an info where I can find an explanation of these error messages?


Manfred


PS:

Instant Version is 6.5.1.0-4.3.1.2_58595; we want to install a GeoTrust certificate with CN=portal.xxx.at

Apr 10, 2017 09:32 AM

There are a lot of different errors for certificates and the exact error message is needed to answer why it does not work like you expected. Most likely is that you access the WebUI on IP-address instead of the name that is in the certificate.

You best chances are to find someone that can look with you and analyze the certificate that is presented to find out if it is wrong and how to solve it. If you have access to Aruba Support, please contact them.

Apr 05, 2017 07:25 PM

Not FUNCTION!!!!


We create a new certificate with Comodo, and still send an error certificate on Aruba Instant.


What are we doing?

Related Entries and Links

No Related Resource entered.