Requirement:Introduction:
This document describes about the 802.1x configuration with Extensible Authentication Protocol (EAP) - Transport Layer Security (TLS) and Aruba Clearpass for binary comparison for a certificate provided by supplicant and the certificate mapped to a user in Active Directory or a generic LDAP server.
Prerequisite:
Clearpass server with appropriate license capabilities (Authentication server).
NAS device to act as a pass through device (Authenticator).
Generic LDAP server or Active Directory (AD).
Client configured to perform EAP-TLS with user or computer certificate (Supplicant).
Solution:Use case:
This is setup will ensure that client certificate present for 802.1x EAP-TLS authentication by the supplicant is mapped to the user present in the AD/LDAP server. Clearpass will compare the certificate presented by the client during TLS authentication and the certificate fetched from AD/LDAP authentication source for the CN name present in the certificate.
Work Flow:
- During an EAP-TLS authentication, client will present its certificate to the authentication server once successfully validating the server certificate (Clearpass radius cert sent previously).
- As the termination is not enabled on the NAD device (Controller or Switch), all EAP transaction will be passed to Clearpass as Radius request.
- Clearpass will validate whether the client signing certificate (Root Cert) is present in the trusted list.
- Once the cert is in the trusted list, Clearpass will perform an LDAP search on the CN name of the cert and fetch the user certificate. Once received the certificate, Clearpass will compare both the certificates (The one received from the supplicant and the data fetched as LDAP attribute).
- If the comparison matches, user authentication will be successful and Clearpass will apply appropriate enforcement based on the enforcement profile.
This will ensure that the certificate (Complete cert) presented by the client is authorized against AD with correct user.
Configuration:As a pre-requisite configure the supplicant, authenticate and Clearpass for a normal 802.1x TLS authentication. For more information regarding this configuration, refer http://community.arubanetworks.com/t5/Community-Tribal-Knowledge-Base/TechNote-v1-3-Aruba-Wireless-and-ClearPass-6-Integration-Guide/ta-p/70714 for configuration on controller and Clearpass for EAP authentication.
Clearpass Config:
- EAP method configuration:
- Create the new EAP-TLS method (or copy default EAP-TLS method) under Policy Manager GUI -> Configuration -> Authentication -> Methods.
- Enabled the option 'Authorization Required'.
- Change the Certificate Comparison option from 'Do Not Compare' (default) to 'Compare Binary'.
- Save the settings and map this new method to the service configured.

- Configure Authentication source:
- Create an AD/Generic LDAP authentication source under Policy Manager GUI -> Configuration -> Authentication -> Sources.
- Modify the 'User Certificate' attribute name in the source under 'Primary' tab.
- Save the configuration.

Mapping a certificate to user in AD:
It is necessary to map the specific certificate to the specific user in AD.
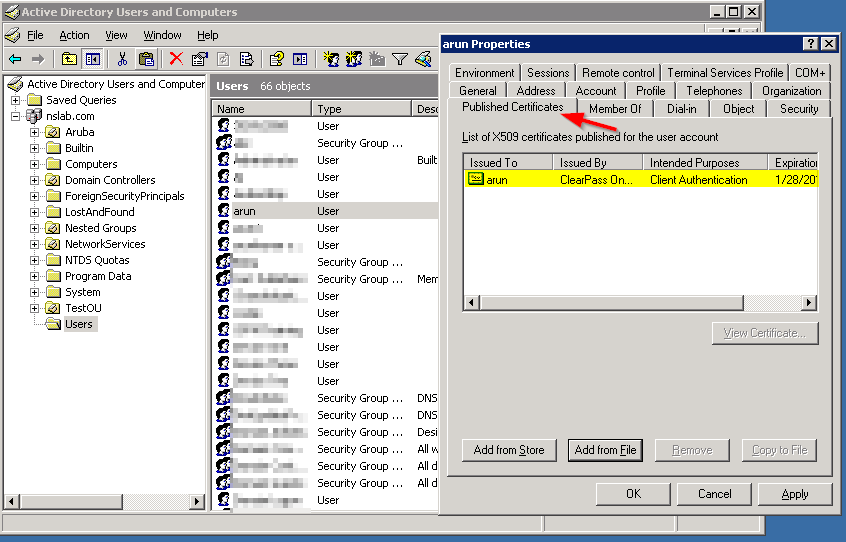
- From Active Directory Users and Computers, navigate to the Users folder.
- Enable 'Advanced Features' option View tab.
- Select the user for which you want to map the certificate to.
- Right client on that user and click on properties.
- Under 'Publisher Certificates', click on 'Add from Store' option to select the certificate created for this user (Alternatively click on 'Add from File' option to select the CER format file copied to AD).
- Click on 'OK' to save the settings.
VerificationVerify user cert mapping:
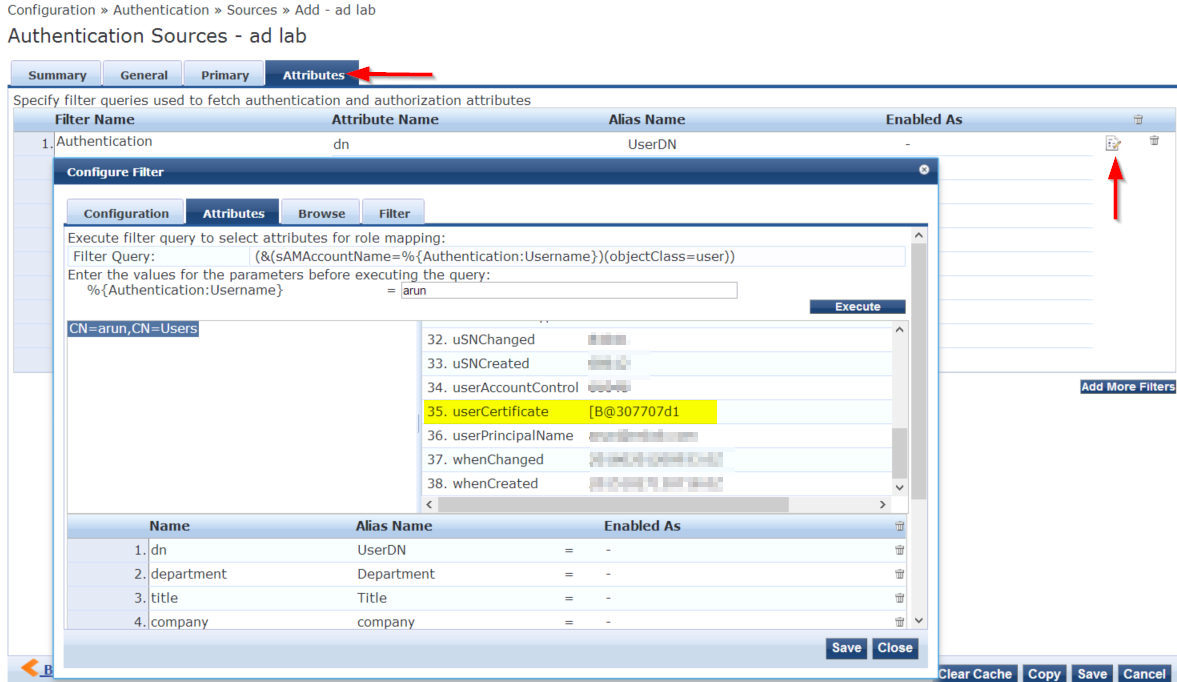
- From Clearpass GUI navigate to Configuration-> Authentication-> Sources and modify the AD auth source.
- Under Attributes tab, click on the Edit option
 .
.
- In the configuration Filter options select the 'Attributes' tab.
- Search for the user name for which the certificate is mapped.
- Scroll through the attributes and check whether 'UserCertificate' attributes is mapped for this issue (Note: complete certificate will not be viewed here).
Guest based LDAP search:
Other method to get the certificate attribute is to create an LDAP server under Guest GUI-> Administration-> Operator Logins-> Servers and perform a search for this user when 'Show detailed Authorization info' option is enabled. This will fetch the 'usercertificate' attribute.
Performing an LDAP search for privileged user level CLI:
Aruba TAC could perform an LDAP search from arubasupport privileged level to check for the user mapping and its binary valie.
Syntax: ldapsearch -h <AD IP address> -D <Base DN> -w <password> -b <Bind DN> >> output_file.txt
[arubasuport@cppm.com]#ldapsearch -h <AD server IP> -D "CN=arun,CN=Users,DC=nslab,DC=com" -w '<password>' -b userdn >> search.txt
[arubasuport@cppm.com]#tail search.txt
File output for search.txt
dn: CN=arun,CN=Users,DC=nslab,DC=com
objectClass: top
objectClass: person
objectClass: organizationalPerson
objectClass: user
cn: arun
userCertificate:: MIIEqjCCA5KgAwIBAgIBBDANBgkqhkiG9w0BAQ0FADCB0jELMAkGA1UEBhMC
VVMxEzARBgNVBAgMCkNhbGlmb3JuaWExEjAQBgNVBAcMCVN1bm55dmFsZTEXMBUGA1UECgwOQXJ1Y
mEgTmV0d29ya3MxQDA+BgNVBAMMN0NsZWFyUGFzcyBPbmJvYXJkIExvY2FsIENlcnRpZmljYXRlIE
F1dGhvcml0eSAoU2lnbmluZykxPzA9BgkqhkiG9w0BCQEWMGQ0NWNlOTk1LTU4ZGYtNDhhNC1hMGQ
wLTcxNjEwYzQxYzRhOEBleGFtcGxlLmNvbTAeFw0xNjAxMjkxNDQwMDFaFw0xNzAxMjgxNTEwMDFa
MG4xCzAJBgNVBAYTAklOMRIwEAYDVQQIDAlrYXJuYXRha2ExDTALBgNVBAcMBGJhbmcxDjAMBgNVB
AoMBWFydWJhMQ0wCwYDVQQDDARhcnVuMR0wGwYJKoZIhvcNAQkBFg5hcnVuQG5zbGFiLmNvbTCCAS
IwDQYJKoZIhvcNAQEBBQADggEPADCCAQoCggEBAKcUX+ZvjP+FFv77W+D88Bx0eTqp1RDhVLsn8Vf
cvh9AAJglMmbmo+D1Ijjj7IapvnlglMzKR4ZocsQZCT7ehKC/LoPvRFTBVpVhDqBfJvSgw523AU1R
3NMZfYPVlFXS7f6omoD75QPSVVvsa8CxZMdpbuflsEldUJ/D9p7EvkokpDLcIJ6IHn0htvy8x+1mh
WE+8dTRwpmbrNdc/iYPeiGrVZ4FDgkg8H38iVCdX/INk/nqtfkgA2ldauzlRVKXNcBUGTEKXeTI4c
f7uZ8wextN398P/mgBxj5KhV5pj3pyffiN+pygFuNpVqFWWI0HslyQ7ChLFQAgmnKGYgHHDCUCAwE
AAaOB7TCB6jAfBgNVHSMEGDAWgBTSb2tyezPP8a5JG1kDALXb8EUprzAdBgNVHQ4EFgQUag1xcfSp
N/OMJ6ntXA2kfuWv+XQwDwYDVR0PAQH/BAUDAweQADATBgNVHSUEDDAKBggrBgEFBQcDAjCBgQYDV
R0RBHoweKR2MHQxFjAUBgsrBgEEAfNnAQUBAQwFcGhvbmUxIjAgBgsrBgEEAfNnAQUBBQwRYWE6Ym
I6Y2M6ZGQ6ZWU6ZmYxFTATBgsrBgEEAfNnAQUBCAwEYXJ1bjEfMB0GCysGAQQB82cBBQELDA5hcnV
uQG5zbGFiLmNvbTANBgkqhkiG9w0BAQ0FAAOCAQEAj1e/BWgzqImfNKtWmguBPygD4Qimv1MWOxPO
/tgweKetVijqufNGCWWuA6EUxQD0zaH2kVv0+elT2pS1ePprJ3IVIPFQHsmUxvlG2/nll4iPMcHlh
GqbUyCVZoD+7M+2pe09+uuLScQxzgTNkaANH1c304qe9mA7LLrU0Tl41i2K51CjPiD0ya0sYmv0mN
Gi8+vNL3M7lfnOFYa0pdzh1tSNInx+HQMeLC99+GIouYqYfqzS6tMd0tax+4WonAypI4bXvaKCh5y
FUEDrW69SJ/ftqjl94N8LN+PN7xocX6iQ8FqInJe4kNZ9Gm1ubZXmxiIqd9UbVXsa/Kfc50lVCA==
givenName: arun
Log Verification :
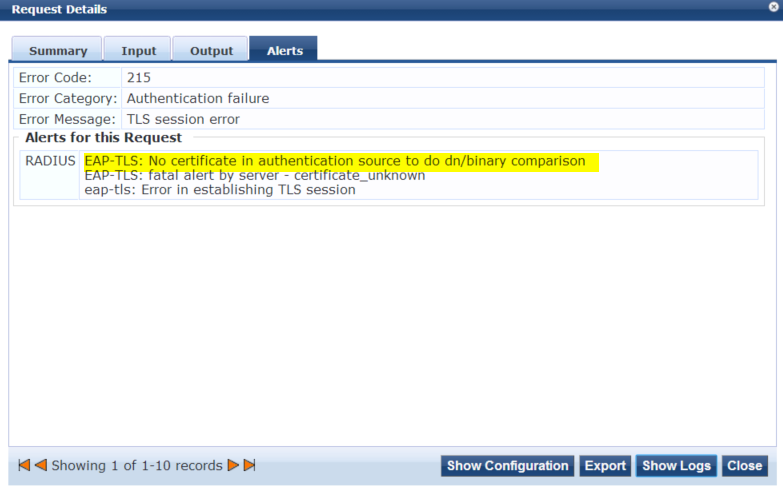
When the Radius log level is in DEBUG, we will be able to see the below message on the Dashboard logs.
Success Logs:

Failed Logs: