Requirement:
This article helps you to generate a self-signed certificate using OpenSSL and install it on the Aruba controller.
Requirement: OpenSSL platform to execute the following single line command to generate a self-signed certificate.
openssl req -x509 -sha256 -newkey rsa:2048 -keyout cert_key.pem -out cert.pem -days xxxx
Solution:
Steps:
Generate a self-signed certificate with private_key in pem format using OpenSSL.
Install the certificate bundle(cert+private_key) on Aruba Controller.
Configuration:
Step 1:
Execute the following command in the OpenSSL and input the requested details to generate the certificate and private key.
openssl req -x509 -sha256 -newkey rsa:2048 -keyout self_cert.pem -out self_cert.pem -days 1825
Note: The above command will generate the certificate with digest Algorithm - SHA256 and 2048 bit RSA Private key(Encrypted). Non-encrypted private key can be generated using below command. The validity of the self-signed certificate will be 1825 days.
openssl req -x509 -sha256 -newkey rsa:2048 -keyout self_cert.pem -out self_cert.pem -days 1825 -nodes
Example:
Executing the command and providing required details will generate the file self_cert.pem, which contains the self-signed server certificate and private key.
sh-4.1# openssl req -x509 -sha256 -newkey rsa:2048 -keyout self_cert.pem -out self_cert.pem -days 1825
Generating a 2048 bit RSA private key
......................................+++
....+++
writing new private key to 'self_cert.pem'
Enter PEM pass phrase:
Verifying - Enter PEM pass phrase:
-----
You are about to be asked to enter information that will be incorporated
into your certificate request.
What you are about to enter is what is called a Distinguished Name or a DN.
There are quite a few fields but you can leave some blank
For some fields there will be a default value,
If you enter '.', the field will be left blank.
-----
Country Name (2 letter code) [XX]:US
State or Province Name (full name) []:California
Locality Name (eg, city) [Default City]:Sunnyvale
Organization Name (eg, company) [Default Company Ltd]:Aruba Networks
Organizational Unit Name (eg, section) []:IT
Common Name (eg, your name or your server's hostname) []:master110.testdomain.com
Email Address []:
sh-4.1# ls
self_cert.pem
sh-4.1# cat self_cert.pem
-----BEGIN ENCRYPTED PRIVATE KEY-----
MIIFDjBABgkqhkiG9w0BBQ0wMzAbBgkqhkiG9w0BBQwwDgQIcdTKrCfo82cCAggA
MBQGCCqGSIb3DQMHBAjCN0BhnwEsigSCBMiM2PsPei5V7i04iqpyRs0VNppUCvnI
/l2odMkdBYd0MNvACHY6MQk6ISOK2WcV3L3GJQEh9hG8MnZM66E3RKkChIcVBS1K
EiMMXM7IyjqAElKIESnghITa1HzvIBIwMNWrxXVkd+HavJCRkPWr10xbW3cHnK6M
aJhMp0XyAycRUUDotCaTGdnMQCgt4p3HAqsRSiAF/9asmwx1ckXqyhF25+pzW6ip
uQ3hNrQlbydSEKePyB3Vu+cMwSMtstayI/SFByaTm0Q0VOHH7sA9iXRaSINGRaVN
33hC3ECDPUZkO+ggqaerUJAddWGfpm23zl8jVytPI2oEVVwhdlOdiYB8n62L/kEF
+BsP0izQikiqo2WwWNvGfY6ngPf645x0V+WE3pZPKHIVGDJlNA+1Xf6xQJnb+G17
e8qbE/eyeZePULTHdcuojmEZED8IjWjdJ+C2Sbpn7Kx4ldNXWowqLmUXn3NdR/yx
fAWO37BJjPeCvv+t9VtYglqJ1QPQBWwpUNXvMc2/tUEwJPd+76mdaWJDZ9ONob20
u7DFExCJpLxQKNAyIlyj+KN3Lp/WU3llwQa6Mp9ewf3+h14xrAc0JcHznqNrXPkV
MapmESpyhN5MGYm/bpsN5Mo037i8OyH7G8Wc5QEo7DILUD/7WkyC7df3CSJYKGCW
zAdVfpfl+cvxF4oHKuO4nQoInqrkEdDWdDYknHIFDfNjNB0p7CrfNS4FgtbxIEwF
3uvppM4bNPGmyEFrbgKxm+FM95N+EI0H6fQJgpsPI3Xc+CWcOE9MQON/NkDRyKBU
0LQ+3OivDmz1YIDBz0YIemqf81uDEXMcbT0Iki/wbG3SWUC7j458qZqAkjBm+AZs
yDy0EI64NRX7BeHOeV3eUedEucXTzsXsCVQskbVU2Z7KDOJ/q2gOqiufz1cb+84h
3Mft9InaniDkrDmqUcYfTic05uW9RvvhsCyIJzkm9Evp32lvRpbuD8dfKGQhpzaw
ysTDaauMSuzsWhUmnHihVo23V6Ai7WvobWsPKolyxN/pVfULcJKJZTYC2GCJ89T9
/pqXlJrByFMMLUUivM1OFepM5h8kHPk5H16kQ0CZWFbNVAVX+8POTQJxhSjvws38
qzUxTfPyXHpyQ3jlS2VtLHn7M/9qektsQMlyrB7+im/1Gx+fiIKMHAc1xq+m3lnB
gXZyXbP2Y0+UUGySaIdg4ScOKJU0Iv5Or0LSHVgQ2QeFH56Cpde3Fx/2xD5mEqpp
SByX/4j5AFAgV8ZerOHj+EP4An5yNta+mOVRKN/C6VQNgnjhqig7CWgeF38Okko/
Bsuh3Sjz1mavpRBmCVbLgxV6vn012gr8lHfziSnnzpj2I8QbnXL7gH4JmvrlmQYi
IxSUfCqyY0yJYUHWUaGxDcEOh8prZmGCdk7V6emwOG6tvuQi/q1A7unkrrq1XGpF
Di+829lWdZRmkeVFn7uGlvMxNV7ID1I+9kdFHstbOIZpFzqV846hdKxHb7lVvR7S
aX9vC/qubWqroed7OWvzZwT1cMsSJ2Hjy9CDsXv/UVyJV0Lepqa/byP6xcgCptj2
TRJhbSarDBsZCa2WeyA9W7LTFGNbwnk/IfS1PMkBg1dTcPOV1Fm69EnzSk4epl2T
EC8=
-----END ENCRYPTED PRIVATE KEY-----
-----BEGIN CERTIFICATE-----
MIIDwzCCAqugAwIBAgIJAOV3X8OSkVOaMA0GCSqGSIb3DQEBCwUAMHgxCzAJBgNV
BAYTAklOMQswCQYDVQQIDAJLQTESMBAGA1UEBwwJQmFuZ2Fsb3JlMRcwFQYDVQQK
DA5BcnViYSBOZXR3b3JrczEMMAoGA1UECwwDVEFDMSEwHwYDVQQDDBhtYXN0ZXIx
MTAudGVzdGRvbWFpbi5jb20wHhcNMTYwOTA4MTQ1NjAyWhcNMjEwOTA3MTQ1NjAy
WjB4MQswCQYDVQQGEwJJTjELMAkGA1UECAwCS0ExEjAQBgNVBAcMCUJhbmdhbG9y
ZTEXMBUGA1UECgwOQXJ1YmEgTmV0d29ya3MxDDAKBgNVBAsMA1RBQzEhMB8GA1UE
AwwYbWFzdGVyMTEwLnRlc3Rkb21haW4uY29tMIIBIjANBgkqhkiG9w0BAQEFAAOC
AQ8AMIIBCgKCAQEAtlk6qtWWIq2CKzSf0Wop2afYXSmha6u61TyEowK8NmLYeEn2
WKEakrjnD2hZD99BPP/E0NI4HSJsjISpvpyMIeaY9ZGekkbtZZXc+qpN5x/eiMpX
qKssdOz1fqmsulogljQgTa0TDVJ6SoO3xgrpD4lHVfE75KbhkOK2iaAQj99m8hvq
iPINVmYQYYi4Vu4BKpCBZGwMofYqwj4qJVpWMuVerHDem7qv8gQvrjS3WQd9wLop
uY7Eue3XsZRm7UnTIo/KeLr5xYQDDGqrY871g77ReQ00bQ05iqdW6PfUWjLhSuya
8m35tjBh8/eW3wqsVmBARm/AKpPur1SiiKfpiQIDAQABo1AwTjAdBgNVHQ4EFgQU
EP44GAURDpK9pmLMNis3K+N36LswHwYDVR0jBBgwFoAUEP44GAURDpK9pmLMNis3
K+N36LswDAYDVR0TBAUwAwEB/zANBgkqhkiG9w0BAQsFAAOCAQEAir5p7zgXMvNa
VHQp7xH+znDOcXtmRmGug5TQNSwVJTvd6fsFdskfp513k+sjB32BLS4DhaVddDIK
zPPWZMIa1tZvnVlvn/MxSManPWYXSQUwl8GD+M3RHhuaEAuNPOcOwusMCohV6YcR
nj9aUOEFWsAA/T7ODeVexwKPJpBkfBk45znHTkcj9+V+AXan+LjgvxP3Rpn7cb0j
dyED06XPF1hFjNNp8Q0R5QNYuJJ7if7gcS7sm98gTkpvcjkyUkF8/X+CF95wwLh3
YVuqmMYPAShHXoceGov9fwjKFGQjflmJ/6e+OZbVZOO3YgprTclL1r9AIJIj5cxr
cD6nvTArJw==
-----END CERTIFICATE-----
Step 2:
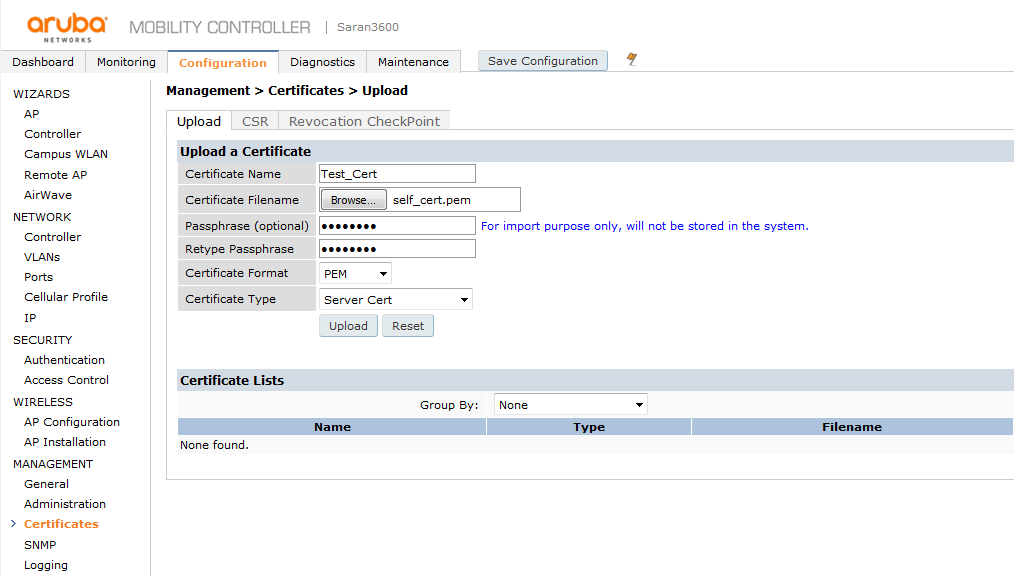
Login to the Aruba Controller and navigate to Configuration >> MANAGEMENT >> Certificate and import the generated self-signed certificate as shown below.
Below are the steps to upload the server certificate using the command line:
Copy the server certificate to the TFTP server and upload the certificate to the controller's flash using the following command.
(Aruba) #copy tftp: X.X.X.X self_cert.pem flash: self_cert.pem
To apply the copied server certificate, use the below command.
(Aruba) #crypto pki-import pem ServerCert "Test_Cert" "self_cert.pem" <passphrase>
Execute the below commands to map the certificate for the controller's web interface.
(Aruba) #configure terminal
(Aruba) (config) #web-server profile
(Aruba) (Web Server Configuration) # switch-cert Test_Cert
Step 3:
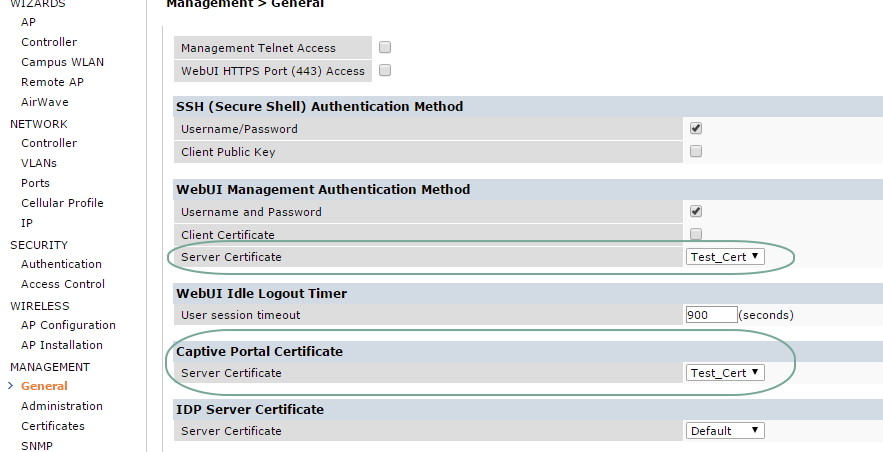
To use the new certificate for Web UI management and Captive portal authentication we need to map the same under Management > General as shown in screen shot below
Below are the steps to map the captive portal and web authentication certificate using the command line:
(Aruba) #configure t
(Aruba) (config) #web-server profile
(Aruba) (Web Server Configuration) #switch-cert Test_Cert
(Aruba) (Web Server Configuration) #captive-portal-cert Test_Cert
(Aruba) (Web Server Configuration) #exit
(Aruba) (config) #exit
(Aruba) #write mem
Saving Configuration...
Configuration Saved.
(Aruba) #process restart httpd
WARNING: Do you really want to restart process: httpd (y/n): y
Restarting: httpd
Note: Using a self signed certificate for captive portal authentication can cause browsers to display a certificate warning. Hence it is recommended to have a publicly signed certificate for captive portal authentication. If there are multiple controllers, we can either install a single publicly signed certificate on all the controllers or go for a wild card certificate.
If using Clearpass as external captive portal, the following KB article will give more information about the configuration change needed on Clearpass Guest.
https://community.arubanetworks.com/t5/AAA-NAC-Guest-Access-BYOD/Weblogin-NAS-Address-configuration-options-in-multi-controller/ta-p/275426
Verification
After the successful installation, we can use the browser tools to inspect the certificate used by controller web UI and confirm that the new certificate is being used.