Creating and Installing a Captive Portal Certificate on Instant from a Public CA
Due to the Advisory here: https://community.arubanetworks.com/t5/Controller-less-WLANs/ArubaOS-Default-Certificate-Revocation-FAQ-Instant/ta-p/275814 all users should be uploading either a self-signed or CA certificate on instant. Below are instructions for a public CA. Please keep in mind that instant does not have a facility to create a CSR or certificate signing request that is needed for a CA, so you have to create your own using OpenSSL. Open SSL can be downloaded here: https://wiki.openssl.org/index.php/Binaries
Steps:
Create a CSR to submit to your Certificate Authority by typing the following on the commandline:
openssl req -newkey rsa:2048 -keyout privatekey.key -out mycsrfile.csr
You should see the following happen:
Generating a 2048 bit RSA private key
...........................+++
.....................................................................................+++
writing new private key to 'privatekey.key'
Enter PEM pass phrase: [Enter private key passphrase twice. You will need it later, so remember it!]
Verifying - Enter PEM pass phrase:
-----
You are about to be asked to enter information that will be incorporated
into your certificate request.
What you are about to enter is what is called a Distinguished Name or a DN.
There are quite a few fields but you can leave some blank
For some fields there will be a default value,
If you enter '.', the field will be left blank.
-----
Country Name (2 letter code) [AU]:US
State or Province Name (full name) [Some-State]:NY
Locality Name (eg, city) []:NY
Organization Name (eg, company) [Internet Widgits Pty Ltd]:Company
Organizational Unit Name (eg, section) []:IT
Common Name (e.g. server FQDN or YOUR name) []:instant.mydomain.com
[instant.mydomain.com will be the fqdn of your server certificate]
Email Address []:admin@mydomain.com
Please enter the following 'extra' attributes
to be sent with your certificate request [optional….can be skipped]
A challenge password []:
An optional company name []:
In the same directory, you should find two files:
- key, which is your private key (you will need this later, along with the passphrase you entered twice)
- csr which is what you will upload to the CA, either by opening with a text editor and copying and pasting or by uploading the mycsrfile.csr to the CA that will issue your server certificate.
Upload or copy and paste the contents of the mycsrfile.csr to the certificate authority when it asks you to. After you do that certificate authority will either allow you to download or will email you two files:
- The server certificate
- The full certificate chain of the CA.
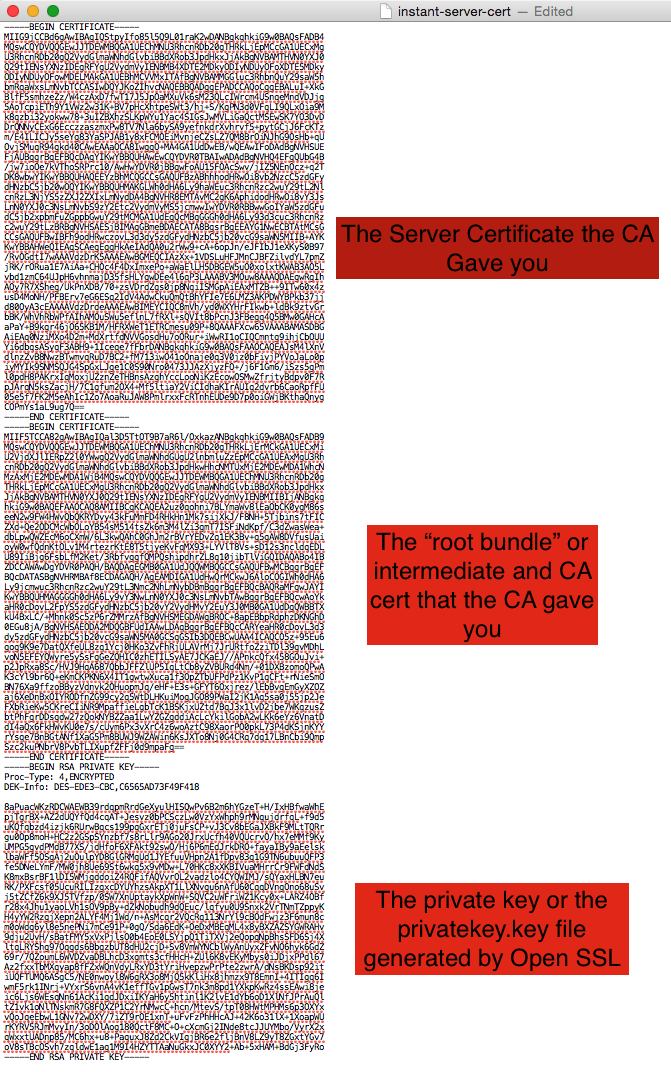
To put it into the proper format, you need to open the two text files the CA gives you back, along with the privatekey.key file in a text editor. Also, create a new blank text file that you will be copying and pasting all of the files into:
Using a text editor, Copy and paste the contents of the three files in this order into a blank text editor page:
- The server certificate that the CA gave you
- The intermediate and CA cert file the CA gave you (the root bundle).
- The contents of the privatekey.key file
It should look something like this:

Save the text file with a .pem extension as instant-server-cert.pem
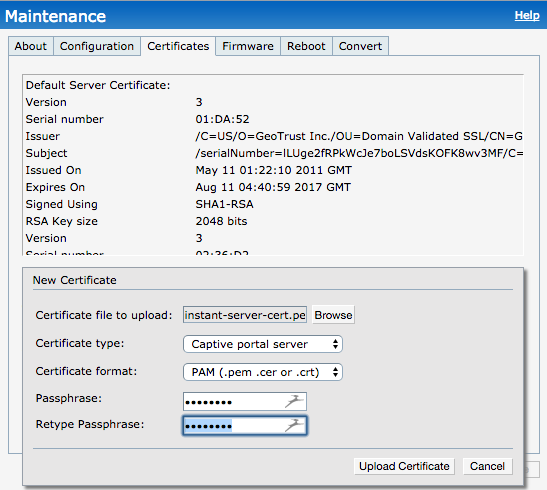
Login to your Instant controller and the go to Maintenance> Certificates and click on Upload New Certificate:

For Certificate Type, choose Captive Portal Server. For Certificate format, choose PAM. Click on Browse to browse to your instant-server-cert.pem file. Type in the passphrase that you chose when you ran the open SSL command above twice. Click on upload certificate.
The instant controller GUI will be unavailable for up to 60 seconds. Wait, and then refresh the page. You should be able to inspect your SSL certificate in the browser when the GUI returns.